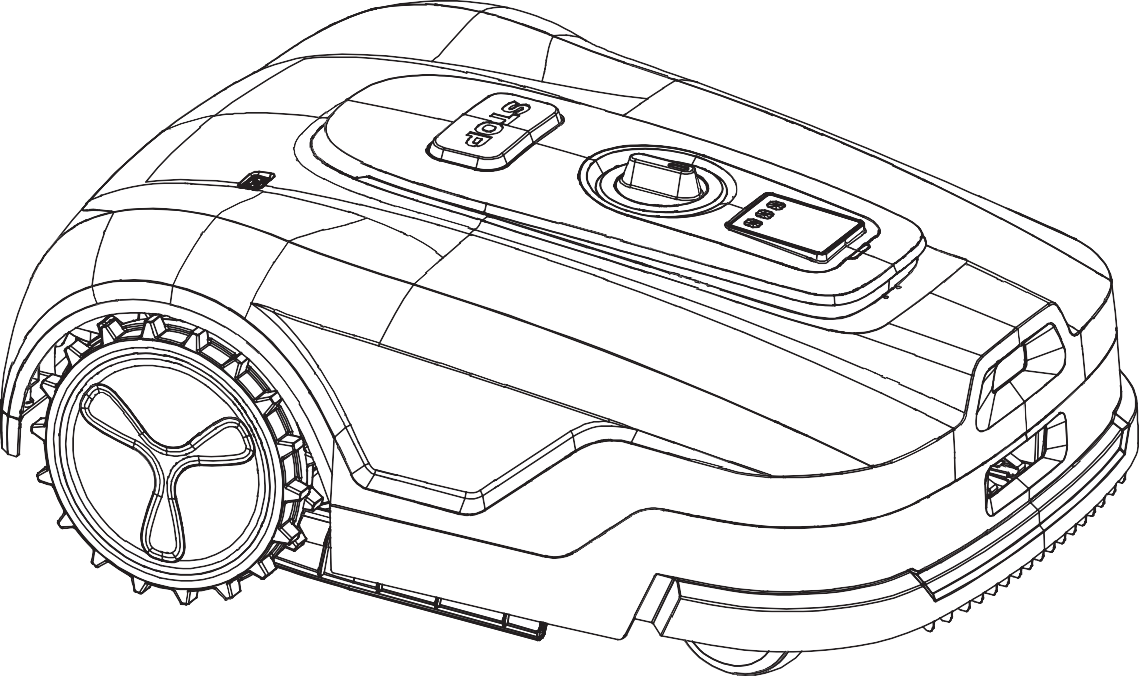
TANGO SERIES
Robotic Lawn Mower
User Manual
1 OVERVIEW
1.1 WELCOME
Thank you for purchasing the LawnSense® Robotic Lawn Mower.
This manual will help you set up and operate your mower safely and efficiently.
1.1.1 LAWNSENSE TANGO SERIES
The LawnSense Tango Series is a new generation of intelligent robotic lawn mowers, integrating advanced positioning and navigation for fully automated lawn care. Featuring a high-precision RTK system, it enables centimeter-level positioning and systematic mowing patterns. Together with visual-inertial odometry (VIO) algorithms, the mower ensures reliable positioning and smooth navigation across diverse terrains and complex landscapes.
Key intelligent features include:
- Automatic path planning and obstacle avoidance
- Automatic return to the charging station and recharging
- Remote control and task scheduling via mobile app
LawnSense Tango is designed to provide a hands-free, efficient, and intelligent solution for maintaining your lawn.
1.2 SAFETY WARNINGS
1.2.1 General Safety Instructions

- Read and understand this user manual carefully before operating the mower.
- Never allow children, persons with reduced physical, sensory, or mental capabilities, or persons lacking experience and knowledge to use the mower unless they are supervised or instructed in the safe use of the product. Local regulations may restrict the age of the operator.
- Do not allow children to play with the mower or remain in its operating area while it is in use.
- Do not operate the mower in areas where people may be unaware of its presence.
- When manually controlling the mower using the LawnSense App, always walk - never run. Exercise extra caution on slopes and maintain stable footing and balance at all times.
- Do not touch moving hazardous parts, including the cutting blades, until they have come to a complete stop.
- Do not operate the mower if any part is damaged, defective, or missing.
- Do not touch or use a damaged power cable. If the cable becomes damaged during operation, disconnect it from the power outlet immediately. Damaged or worn cables increase the risk of electric shock and must be replaced by qualified service personnel.
- Use only the charging station supplied with the product. Using an incompatible charging device may result in electric shock, overheating, fire, or battery damage.
- In the event of battery electrolyte leakage, avoid direct contact with the liquid. If contact occurs, rinse the affected area immediately with plenty of clean water. If the liquid comes into contact with the eyes, seek medical attention immediately
- Use only original LawnSense batteries. The safe operation of the product cannot be guaranteed when non-approved batteries are used.
- Keep power and extension cords away from moving parts to prevent damage that could expose live electrical components.
- The illustrations, diagrams, and screenshots in this manual are provided for reference only. Actual product appearance and software interfaces may vary.
1.2.2 Safety Instructions for Operation
- Keep hands and feet away from the cutting blades. Never place hands or feet underneath the mower while it is powered on.
- Do not lift, carry, or move the mower while it is powered on.
- Ensure that there are no objects such as stones, branches, tools, or toys on the lawn. Objects may be thrown by the blades, causing injury, property damage, or damage to the mower.
- Do not place any objects on the mower, charging station, or RTK reference station.
- Do not use the mower if the STOP button is not functioning.
- Switch off the mower before inspection, maintenance, cleaning, or transportation.
- Do not operate the mower while a sprinkler system is active. Use the scheduling function to avoid conflicts with pop-up sprinklers.
- Do not operate the mower in the presence of standing water in the task area, such as during heavy rain or water pooling.
- Wear sturdy footwear and long trousers when operating the mower.
- If the mower vibrates abnormally, switch it off immediately and inspect it for any damage before restarting. If the problem persists, do not operate the mower and contact customer support.
1.2.3 Safety Instructions for Maintenance
- Power off the mower when performing maintenance. Disconnect the plug from the charging station before cleaning or performing maintenance on the charging station.
- Do not use a high-pressure washer or solvents to clean the mower.
- Do not reverse the mower to wash the chassis. If you do reverse it for cleaning purposes, make sure to restore it to its proper orientation afterward. This precaution is necessary to prevent water from leaking into the motor and potentially affecting normal operation.
1.2.4 Battery Safety
- Lithium-ion batteries can explode or cause a fire if disassembled, short-circuited, exposed to water, fire, or high temperatures. Handle them with care. Do not dismantle or open the battery, and avoid any form of electrical/mechanical abuse. Store them away from direct sunlight.
- Only use the battery charger and power supply provided by LawnSense. The use of an inappropriate charger and power supply can cause electric shocks and/or overheating.
- Do not attempt to repair or modify the batteries. Repair attempts may result in severe personal injury, due to explosion or electrical shock. If a leak develops, released electrolytes are corrosive and toxic.
- This mower contains batteries that are only replaceable by skilled persons.
1.2.5 Residual Risks
- To avoid injuries, wear protective gloves when replacing the blades.
1.2.6 Disposal
- Dispose of this product in compliance with local electronic waste (WEEE) regulations. Do not dispose of it with regular household waste. Instead, bring it to an authorized recycling center or collection point to ensure safe handling and environmentally responsible disposal of electronic components.
1.3 SYMBOLS AND DECALS
Please study these symbols on the product and understand their meaning:
 |
WARNING - Read user instructions before operating the machine |
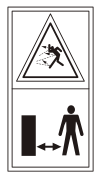 |
WARNING - Keep a safe distance from the machine when operating |
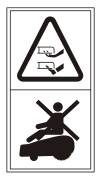 |
WARNING - Do not ride on the machine |
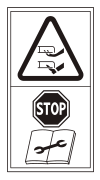 |
WARNING - Operate the disabling device before working on or lifting the machine |
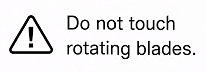 |
CAUTION - Do not touch the rotating blades |
 |
Water proof level |
 |
Class III machine |
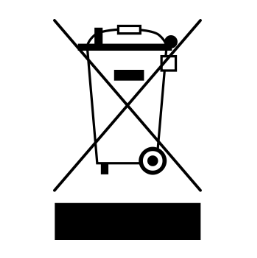 |
Do not dispose of this product as normal domestic waste. Please recycle this product according to local legal regulations. |
 |
The product complies with the applicable European directives. |
 |
This device complies with Part 15 of the FCC Rules. Operation is subject to the following two conditions: (1) this device may not cause harmful interference, and (2) this device must accept any interference received, including interference that may cause undesired operation |
 |
This side up |
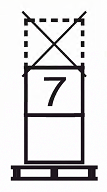 |
Stack up to 7 layers |
 |
Keep dry |
 |
Fragile |
 |
Do not step on |
1.3.1 EU Compliance Statement
Futrobo Robotics (Suzhou) Co., Ltd. hereby declares that the product complies with the essential requirements of the Radio Equipment Directive (2014/53/EU) and the Machinery Directive (2006/42/EC).
The full text of the EU Declaration of Conformity is available at the following internet address:
https://www.lawnsenserobot.com/docs/compliance
1.4 WHAT’S IN THE BOX?
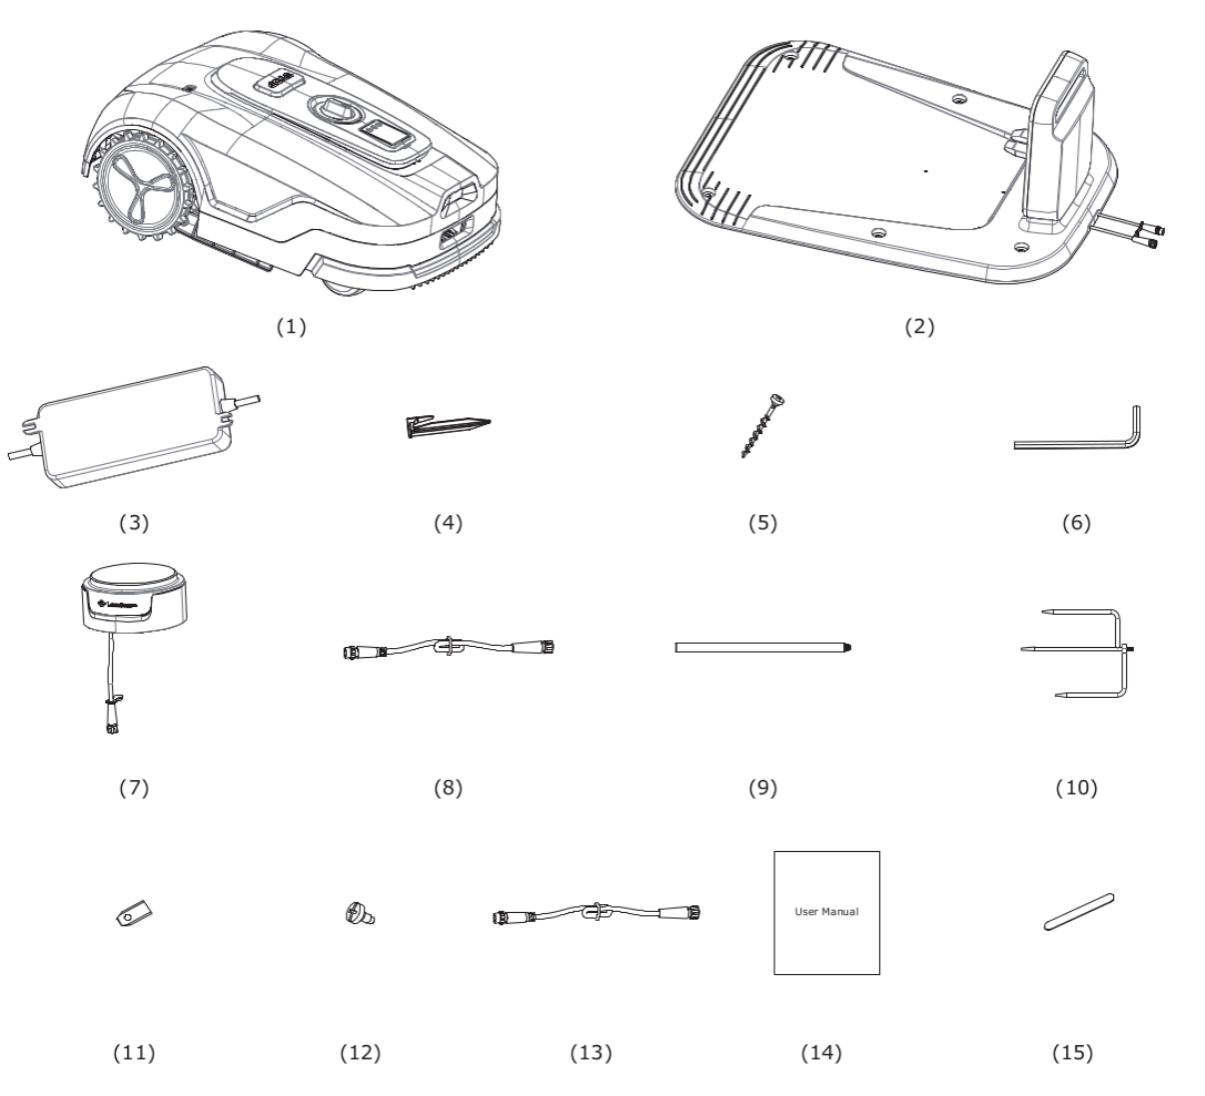
| No. | Item | No. | Item | No. | Item |
|---|---|---|---|---|---|
| 1 | Robotic Mower | 2 | Charging Station | 3 | Power Adapter |
| 4 | Cable Pegs x10 | 5 | Ground Pegs x6 | 6 | Ground Peg Wrench |
| 7 | RTK Reference Station | 8 | RTK Reference Station Extension Cable | 9 | RTK Reference Station Mounting Poles x3 |
| 10 | Tripod | 11 | Blades x12 | 12 | Blade Fixing Screws x12 |
| 13 | Adapter Extension Cable | 14 | User Manual | 15 | Hook and Loop Straps x5 |

After unboxing, check all accessories against the illustration provided. If any parts are missing or damaged, it is recommended to keep the packaging and the product in its current condition and contact customer support.
1.5 PARTS AND FUNCTIONS
1.5.1 Mower
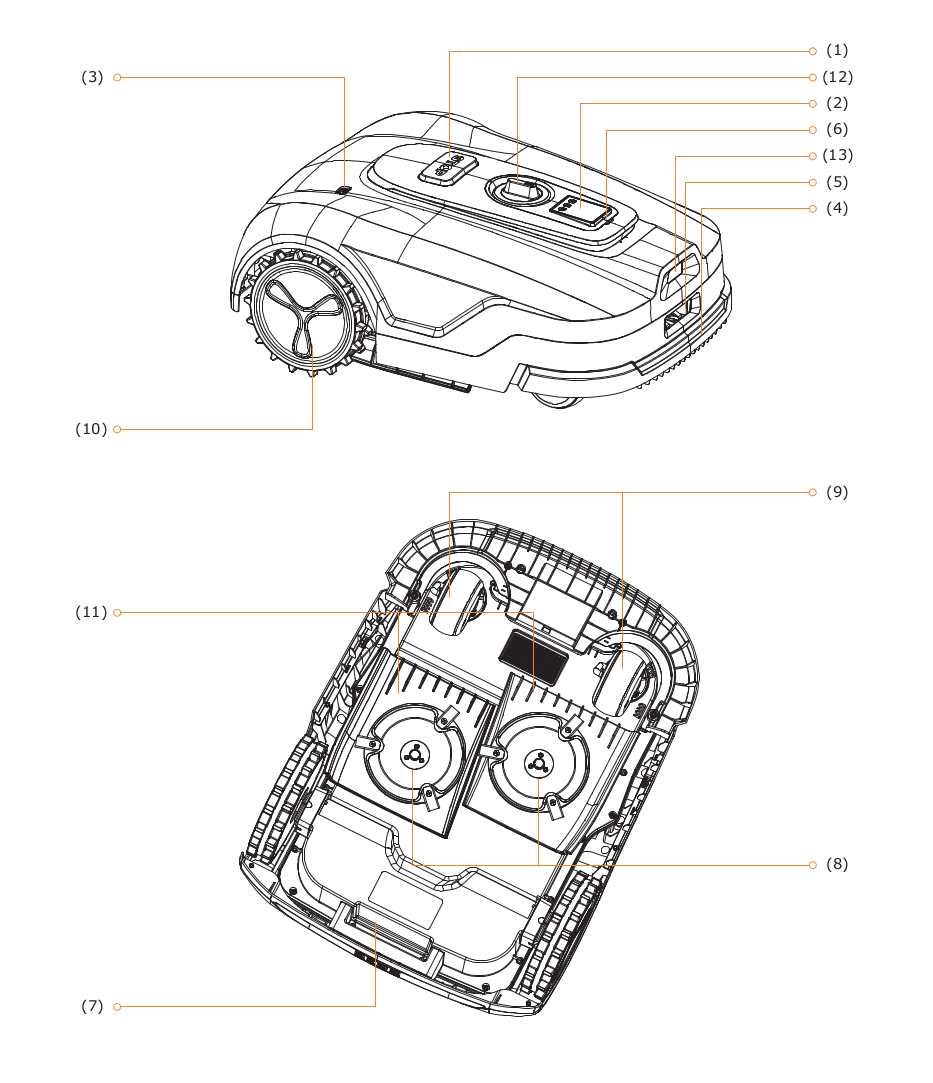
| No. | Component | Function |
|---|---|---|
| 1 | Emergency Stop Button | Used to immediately halt the mower operation in an emergency. |
| 2 | Mower Display Screen | Displays the mower’s status and password information. |
| 3 | Rain Sensor | Triggers automatic return to the charging station when rain is detected. |
| 4 | Bumper | Detects obstacles through physical contact and triggers obstacle avoidance. |
| 5 | Charging Port | Connects to the charging station for recharging. |
| 6 | Status Indicator Light | Solid Red: Fault alarm, critical error. Flashing Red: Blade disc startup warning, anti-theft alarm triggered, shutdown process, upgrading. Flashing Blue: Charging in progress. Solid Blue: Fully charged. Solid Green: Normal operation, not on charging station. Flashing Green: Mapping, mowing, or returning in progress; downloading. Solid Yellow: Warning; no map available. |
| 7 | Carrying Handle | Used for lifting and carrying the mower. |
| 8 | Blade Disc | Rotating assembly that houses the cutting blades. |
| 9 | Front Wheels | Supports mower movement and enables lift detection when raised. |
| 10 | Rear Wheels | Provide drive and steering for the mower. |
| 11 | Grass Comb | Combs the grass before cutting. |
| 12 | Cutting Height Adjuster | Adjusts the cutting height of the mower blades. |
| 13 | Camera | Used for vision-based obstacle detection and vision-assisted positioning. |
1.5.2 Control panel
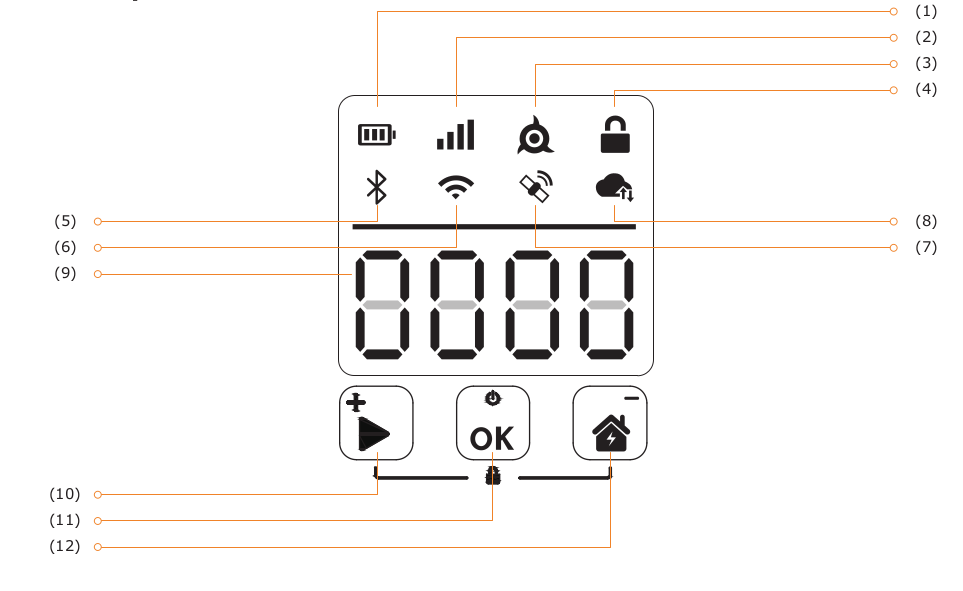
| No. | Component | Function |
|---|---|---|
| 1 | Battery Indicator | Displays the battery level: Solid Green – Battery level above 60% Solid Yellow – Battery level between 20% and 60% Solid Red – Battery level between 5% and 20% Flashing Red – Battery level below 5% |
| 2 | Network Icon | Indicates cellular network connection status. |
| 3 | Blade Disc Icon | Indicates whether the cutting disc is operating. |
| 4 | Lock Icon | Indicates safety lock and child lock status. |
| 5 | Bluetooth Icon | Indicates Bluetooth connection status. |
| 6 | Wi-Fi Icon | Indicates Wi-Fi connection status. |
| 7 | RTK Icon | Indicates RTK signal status. |
| 8 | Update Icon | Indicates OTA (Over-The-Air) upgrade status. |
| 9 | Segment Display | Displays operating status, error codes, charging information, and mowing progress. |
| 10 | START Key | Long Press (5s): Restart mowing (used with OK key). Short Press: Start mowing (used with OK key). During password operation, acts as the number increment (+) button for PIN input. |
| 11 | OK Key | Long Press (5s): Power On/Off. Short Press: Confirmation key for mower actions. During password operation, acts as the confirmation key for PIN input. |
| 12 | HOME Key | Long Press (5s): Enters password mode. Short Press: Command return to charging station (used with OK key). During password operation, acts as the number decrement (-) button for PIN input. |
1.5.3 Segment Display
Examples of status information displayed on the segment display:
| Status | Display | Status | Display |
|---|---|---|---|
| Standby | 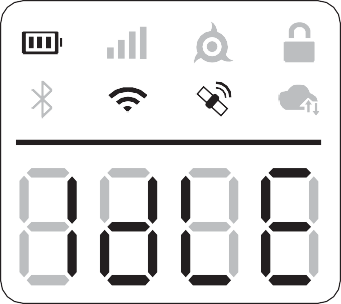 |
Mowing in Progress | 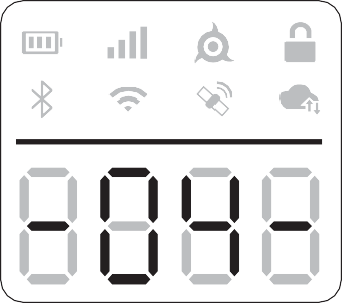 |
| Battery Charging | 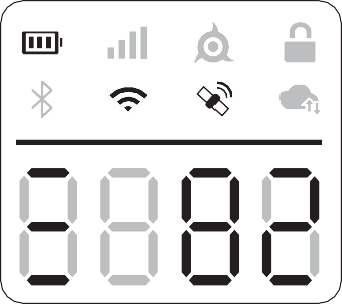 |
Emergency Stop Activated | 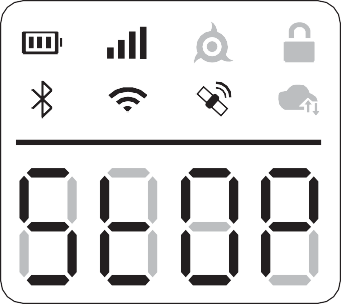 |
| Error Code Displayed | 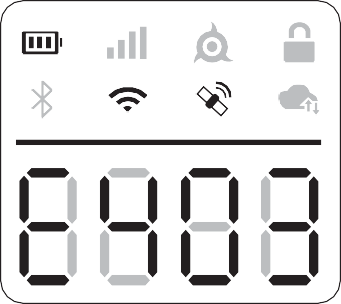 |
OTA Downloading | 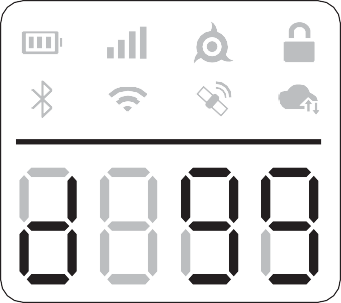 |
| OTA Upgrading | 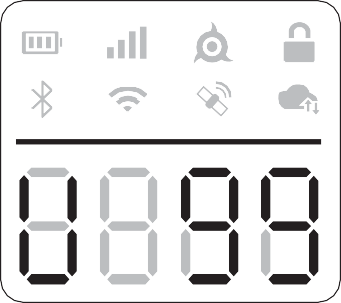 |
Battery Level Display | 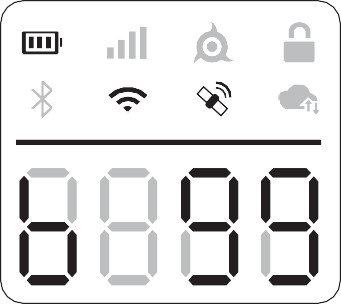 |
1.5.4 Panel Operations
| Operation | Action |
|---|---|
| Power On / Off | Press and hold the OK key for more than 5 seconds. |
| Start Mowing | Press START and then press OK. |
| Restart Mowing | Press and hold START for more than 5 seconds, then press OK. |
| Return to Charging Station | Press HOME and then press OK. |
| Emergency Stop | Press the Emergency Stop (STOP) button. |
| Lock the Mower | Press and hold the HOME key for more than 5 seconds. |
| Unlock the Mower | Enter the correct PIN code on the mower’s display. |
1.5.5 How to Enter the PIN Code
When the mower is powered on and enters the PIN entry screen, the lock icon will be solid. The flashing digit indicates which position is currently ready for input. Use the + (START) and - (HOME) keys to select the desired number for each digit, and press OK to confirm each one. After all digits are entered and confirmed with OK, the display will return to the IDLE screen.
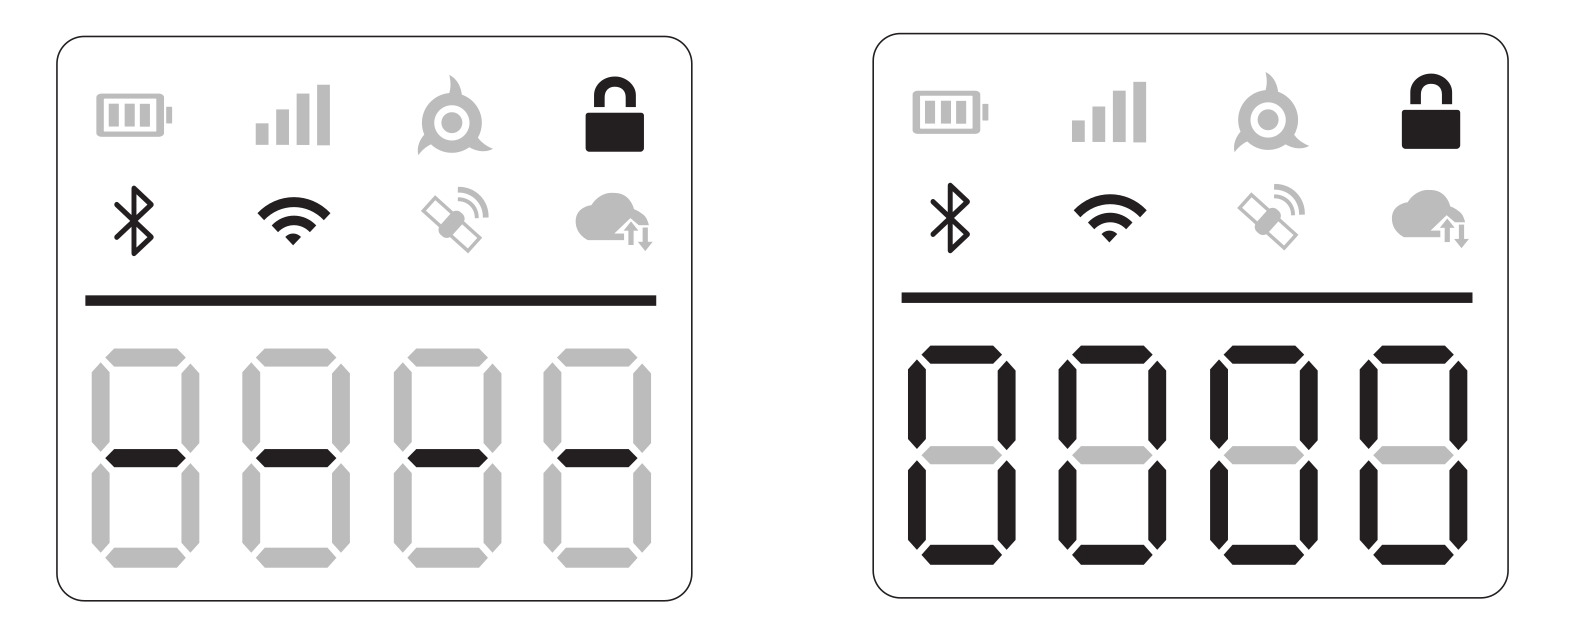
The default PIN code is “0000”. You can reset the PIN to a new one via the LawnSense App.
1.5.6 Charging Station
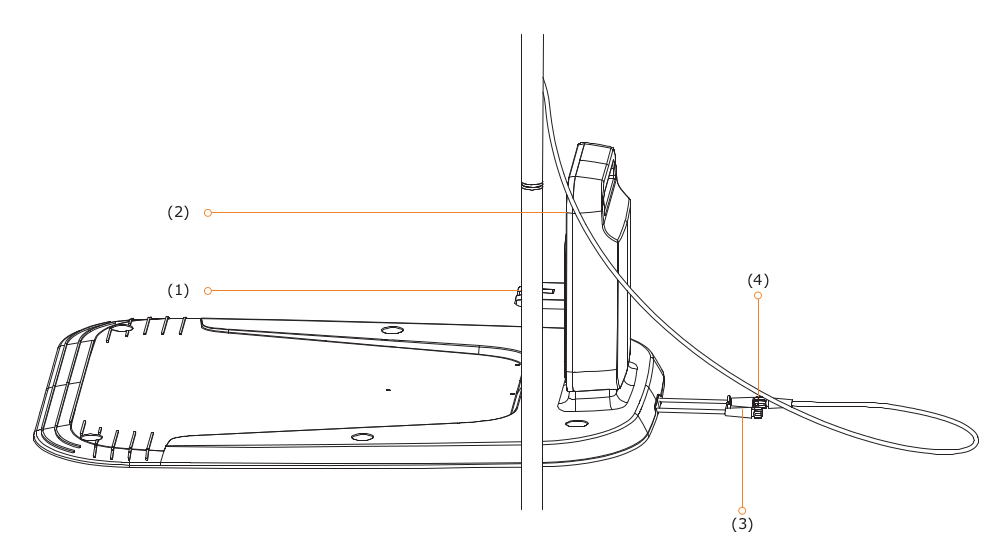
| No. | Component | Function |
|---|---|---|
| 1 | Charging Contacts | Connects to the mower’s charging port for recharging. |
| 2 | Charging Station Indicator Light | Indicates the charging station status: Solid Green: Power on, normal operation Solid Blue: Mower is charging Solid Red: Charging station fault |
| 3 | Power Input Port | Connects to the power adapter. |
| 4 | RTK Reference Station Power Output | Connects and provides power to the RTK reference station. |
1.5.7 RTK Reference Station
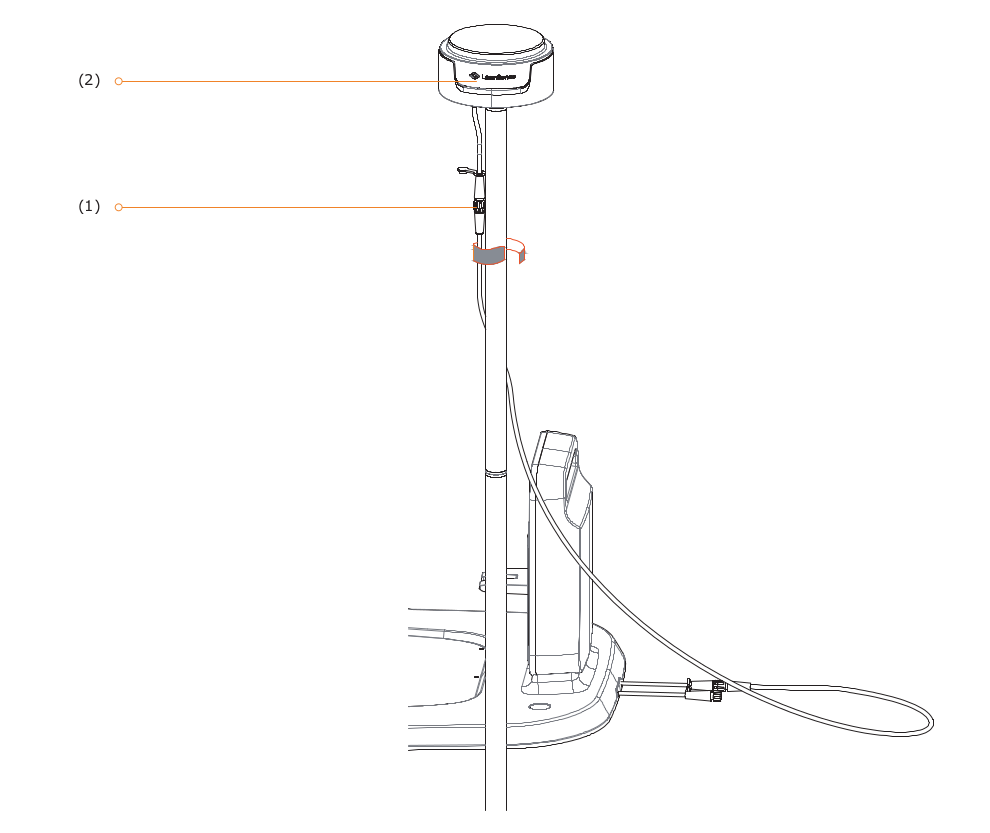
| No. | Component | Function |
|---|---|---|
| 1 | Power Input Port | Connects to the charging station’s RTK reference station power output. |
| 2 | RTK Reference Station Indicator Light | Indicates RTK reference station status: Flashing Blue: Searching for signal Solid Blue: RTK signal ready and stable |
1.6 SPECIFICATIONS
| Category | Item | Tango 2000 | Tango 4000 | Tango 6000 |
|---|---|---|---|---|
| Basic Information | Product Name | LawnSense® Robotic Lawn Mower Tango Series | ||
| Dimensions: Length x Width x Height | 678 x 503 x 276 mm (26.69 x 19.8 x 10.87 in) | |||
| Net Weight (Battery Included) | 15 kg (33 lbs) | |||
| Mower Parameters | Recommended Mowing Area | Up to 2000 m² (0.5 acre) | Up to 4000 m² (1 acre) | Up to 6000 m² (1.5 acre) |
| Typical Runtime Per Full Charge [1] | 80 min | 80 min | 160 min | |
| Area Capacity Per Hour | 280 m² (0.07 acre) | 280 m² (0.07 acre) | 330 m² (0.08 acre) | |
| Cutting Width | 35 cm (13.78 in) | |||
| Cutting Height | 20 - 70 mm (0.8 - 2.8 in) | |||
| Cutting Speed | 0.4 m/s - 0.6 m/s | |||
| Charging Time | 90 min | 50 min | 80 min | |
| GNSS Working Mode | GPS, BeiDou, Galileo, GLONASS | |||
| Working Conditions | Operating Temperature | 0 - 40 °C (32 - 104 °F); 10 - 35 °C (50 - 95 °F) recommended | ||
| Storage Temperature | -20 - 50 °C (-4 - 122 °F); 10 - 35 °C (50 - 95 °F) recommended | |||
| IP Rating | IP66 for mower body, charging station and power supply | |||
| Max. Incline Inside Working Area | 24° / 45% | |||
| Max. Incline at Boundary | 14° / 25% | |||
| Noise Level | 60 dB(A) | |||
| Connectivity | Bluetooth® | BT 5.2, BLE | ||
| Wi-Fi | Wi-Fi 2.4GHz 802.11b/g/n/ax | Wi-Fi 5GHz 802.11a/n/ac/ax | ||
| Cellular | Global (North America, Europe, Australia and other supported regions) LTE-FDD: B1/2/3/4/5/7/8/12/13/18/19/20/25/26/28/66 LTE-TDD: B34/38/39/40/41 WCDMA: B1/2/4/5/6/8/19 GSM/EDGE: B2/3/5/8 |
Europe LTE-FDD: B1/3/7/8/20/28A LTE-TDD: B38/40/41 WCDMA: B1/8 GSM/EDGE: B3/8 |
||
| Driving Motor | Rated Speed | 64 rpm | ||
| Motor Type | Brushless | |||
| Blade Motor | Rated Speed | 3390 rpm | ||
| Motor Type | Brushless | |||
| Battery | Battery Type | Lithium-ion | ||
| Nominal Voltage | 18 V DC | 18 V DC | 18 V DC | |
| Nominal Capacity | 5 Ah | 5 Ah | 10 Ah | |
| Charge Current | 3 A | 5 A | 7 A | |
| Charging Ambient Temperature | 0 - 45 °C (32 - 113 °F) | |||
| Battery Management System | Over-temperature, short circuit, over-current and over-charge protection | |||
| Power Supply | Model | Europe: GM95-240300-2DG North America: GM95-240300-1DG Australia: GM95-240300-4DG |
Europe: FY1502405000E North America: FY1502405000U Australia: FY1502405000S |
Europe: FY1692407000E North America: FY1692407000U Australia: FY1692407000S |
| Input Voltage | 100 - 240 V AC | |||
| Output Voltage | 24 V DC MAX | |||
| Output Current | 3 A MAX | 5 A MAX | 7 A MAX | |
| Charging Station | Input Voltage | 24 V DC MAX | ||
| Input Current | 3 A MAX | 5 A MAX | 7 A MAX | |
| Output Voltage | 24 V DC MAX | |||
| Output Current | 3 A MAX | 5 A MAX | 7 A MAX | |
| Indicator | LED | |||
| RTK Reference Station | Model | K803 | ||
| Input Voltage | 5 V DC | |||
| Input Current | 1 A | |||
| Other Features | Drive System | Rear-Wheel Drive | ||
| Sensors | Collision Sensor, Lift Sensor, IMU, RGB-TOF Camera | |||
| Packaging | Packaging Dimensions | 820 x 620 x 370 mm (32.2 x 24.4 x 14.5 in) | ||
[1] Tested at a standard cutting speed with a full battery at an ambient temperature of 25 °C (77 °F) while mowing a fresh-cut lawn.
1.7 ACCESSORIES
The following accessories are sold separately:
- RTK Reference Station Extension Pole
- RTK Reference Station Wall Mount Kit
- RTK Reference Station Power Extension Cable
- Replacement Blades
- Garage
2 INSTALLATION AND MAPPING
2.1 GETTING STARTED
2.1.1 Install and Set Up the App

Scan the QR code above to download the LawnSense App, or download from our official website https://www.lawnsenserobot.com.
During use, the App may request permissions for Bluetooth, location services (GPS), and Wi-Fi access as required. These permissions are necessary for normal device operation. Ensure they are enabled. For more information, refer to the Privacy Policy in the App: “Settings” > “Application” > “About” > “Privacy Policy”.
2.1.2 Prepare the lawn
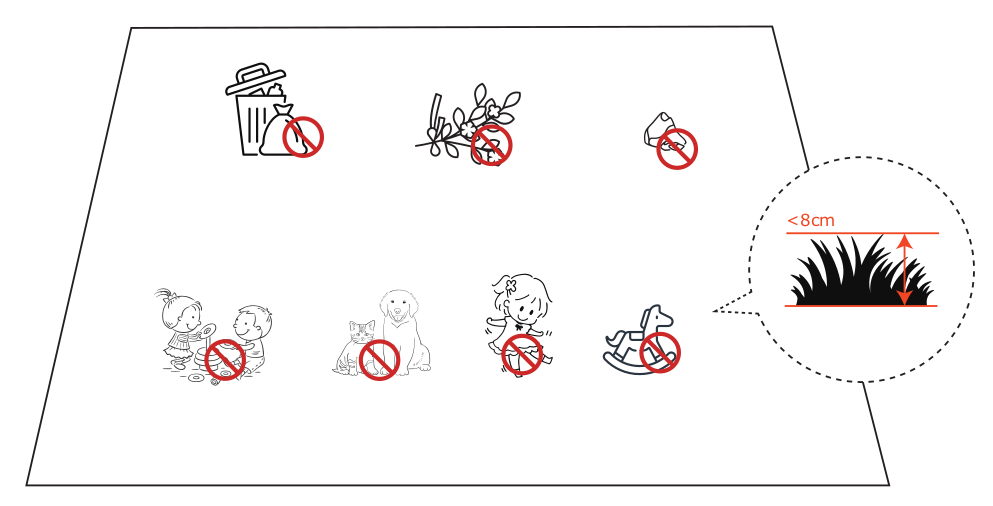
Cut the grass to a height not exceeding 8 cm. Remove debris, leaves, toys, wires, stones, and other objects from the lawn. Ensure that children and pets are kept away from the mowing area during operation..
2.1.3 Charge the mower for the first time
New mowers may have a low battery level due to extended storage. Before first use, fully charge the mower. Place the mower on the charging station and ensure proper contact with the charging terminals. Allow the mower to charge until the display shows 100% battery level.
2.2 ACTIVATE THE MOWER
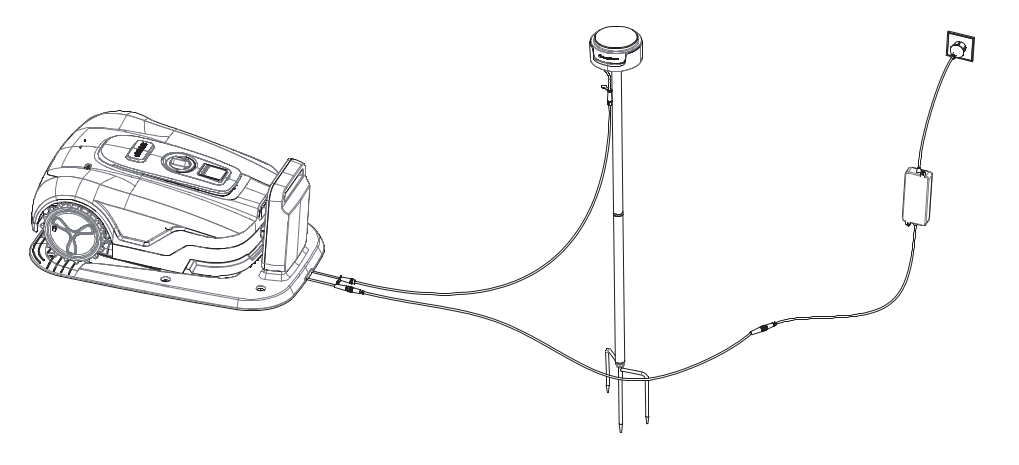
Place the mower in the charging station and power on the charging station. The mower will power on automatically upon docking, or you can manually power on the mower following the control panel operations.
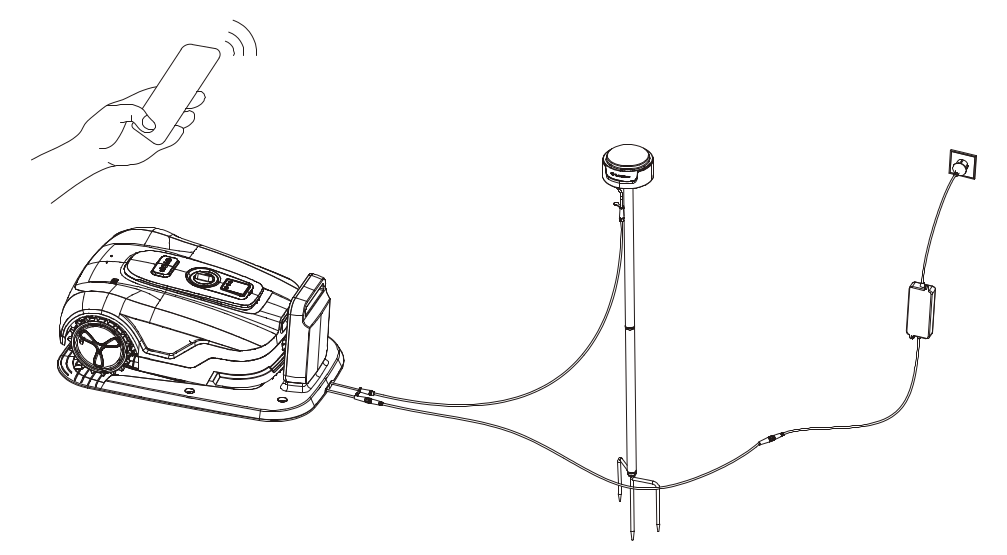
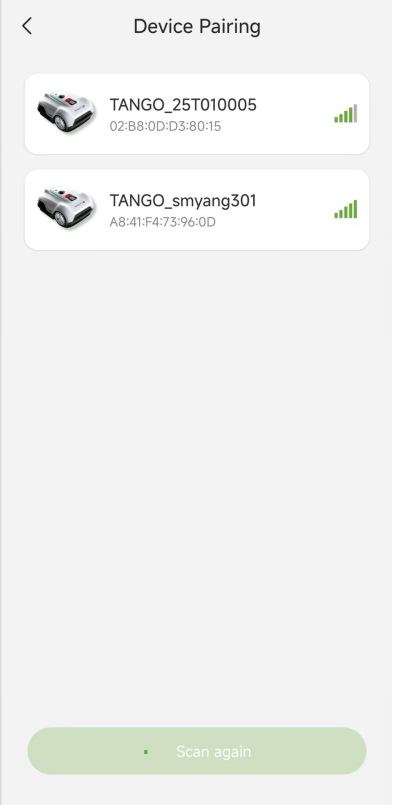
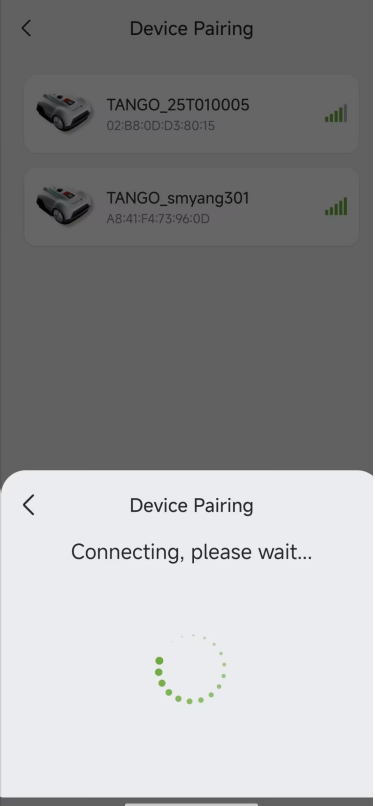
In the LawnSense App on your phone, pair with the mower and connect it to your Wi-Fi network.
2.3 FIND LOCATIONS
The basic principles for placing the antenna and charging station are as follows:
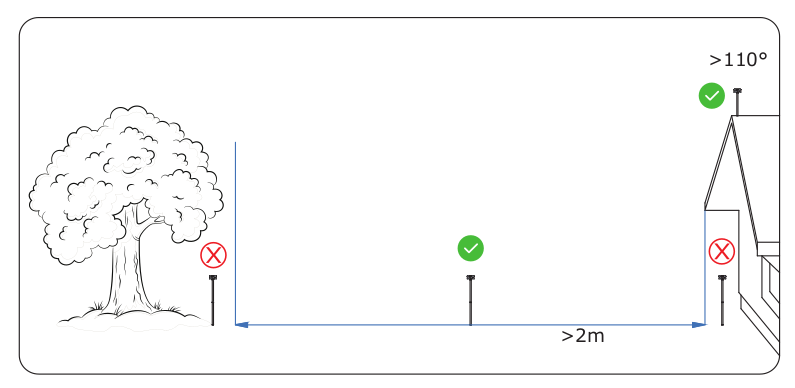
- Maintain a certain distance (greater than 2 meters / 6.6 feet) from buildings, trees, and walls.
- Place the charging station and antenna in an open, unobstructed area.
- Place the charging station and antenna on flat, non-hardened ground and ensure they remain upright. Never install them on a slope.
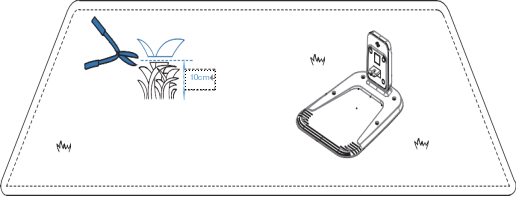
2.3.1 Charging Station Location
Choose flat, stable ground, avoiding slopes or loose soil.
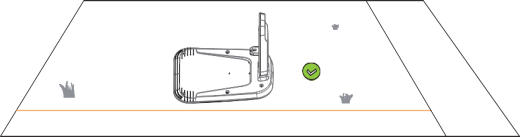
Maintain at least 2 meters of clear space around the charging station to ensure smooth mower access and exit.
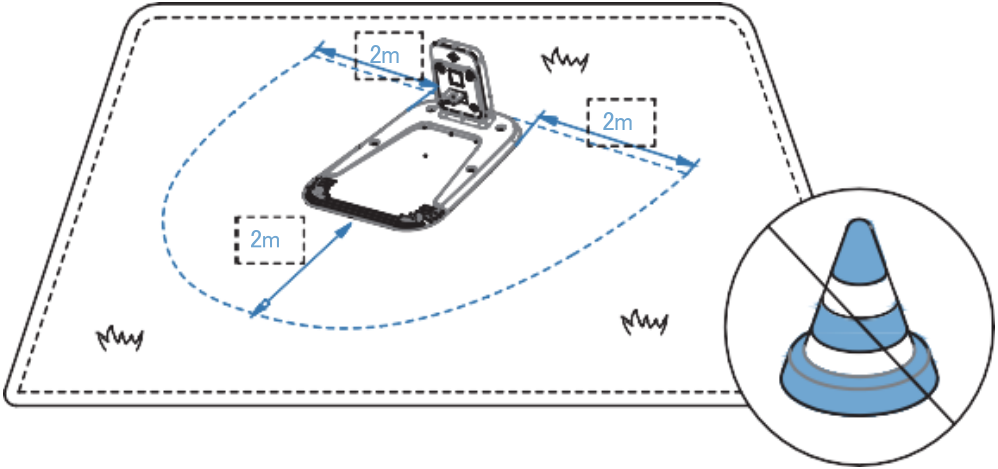
The grass height around the charging station should be less than 10 cm to avoid affecting the automatic return and docking function.
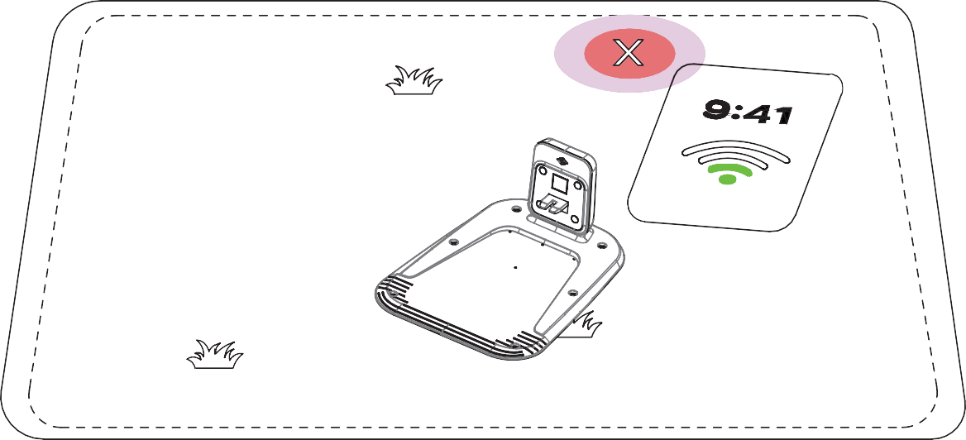
The charging station must be located within stable coverage of your home Wi-Fi network to ensure reliable remote communication with the app.
2.3.2 Antenna Location
Select an open area free of signal obstructions. Ensure there are no buildings or trees within at least 2 meters around the antenna.
2.4 INSTALL THE ANTENNA AND THE CHARGING STATION
2.4.1 Install the Charging Station
Connect the adapter plug to the charging station’s power input port and fasten the threaded sleeve.
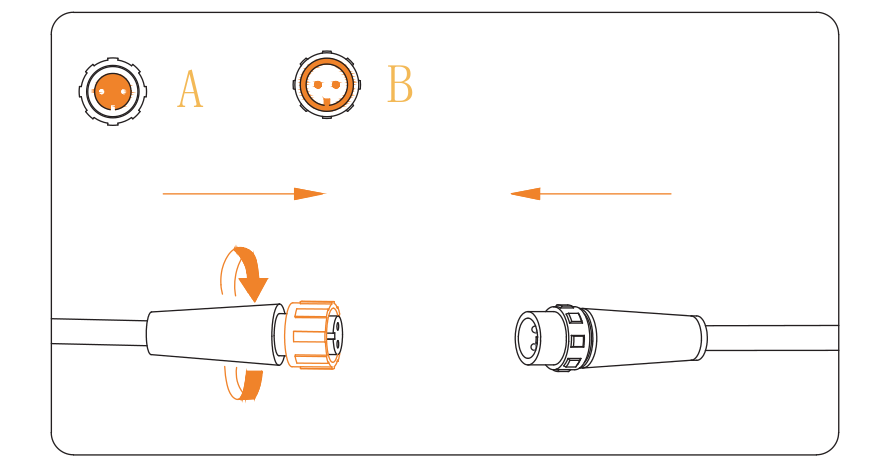
If the adapter cable is too short, connect the charging extension cable.
Plug the power cord into a waterproof outlet. Observe if the green light illuminates (it will dim after one minute).
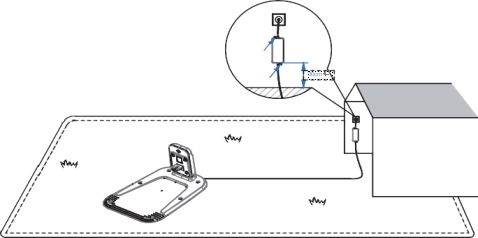
Make sure the power adapter is placed at least 30 cm above the floor and kept away from direct sunlight or moisture to prevent damage.
2.4.2 Install the RTK Antenna
Connect the upper and lower mounting poles, ensuring a secure fit.
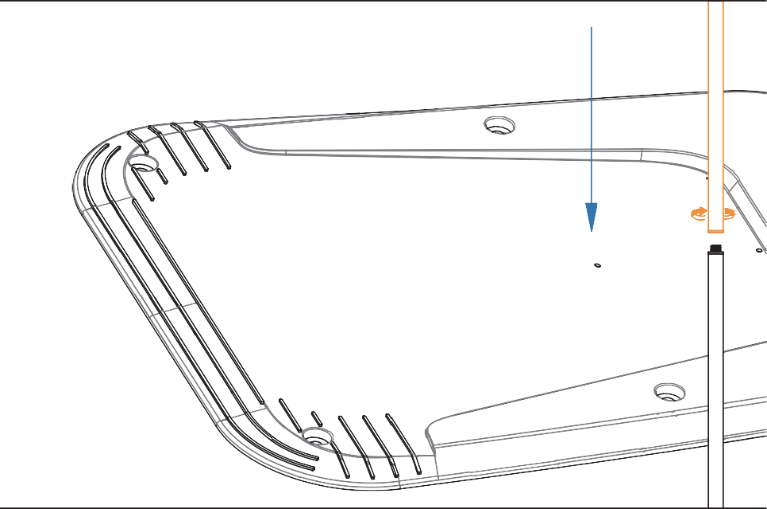
Attach the tripod to the mounting pole, ensuring it is secure and does not wobble.
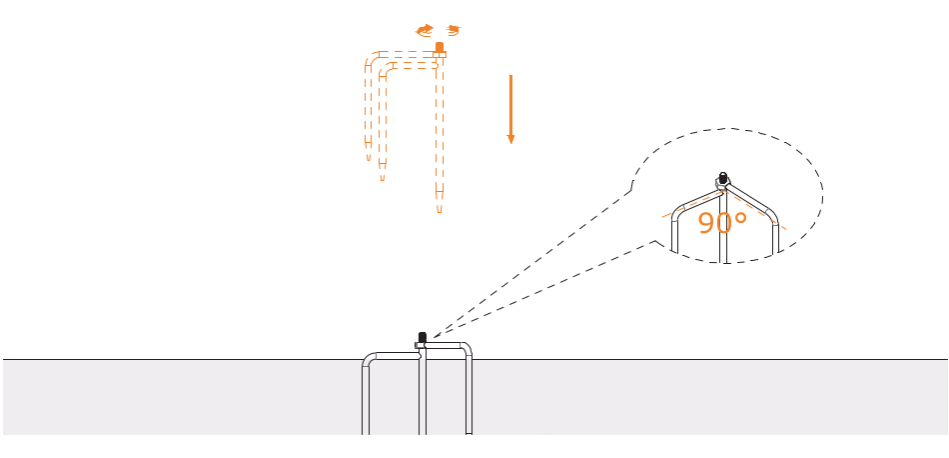
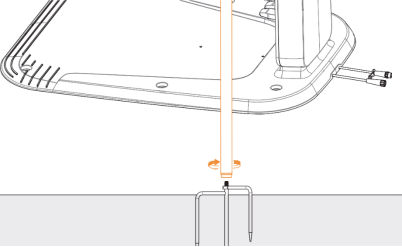
Mount the RTK reference station onto the mounting pole.
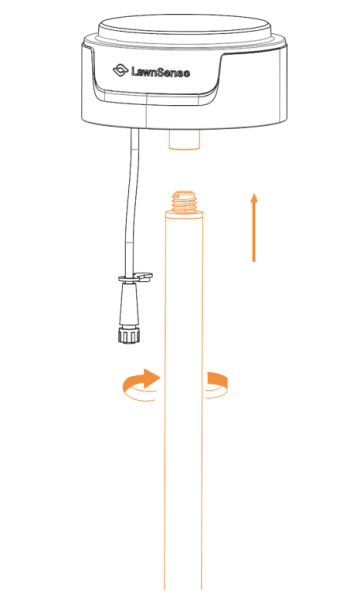
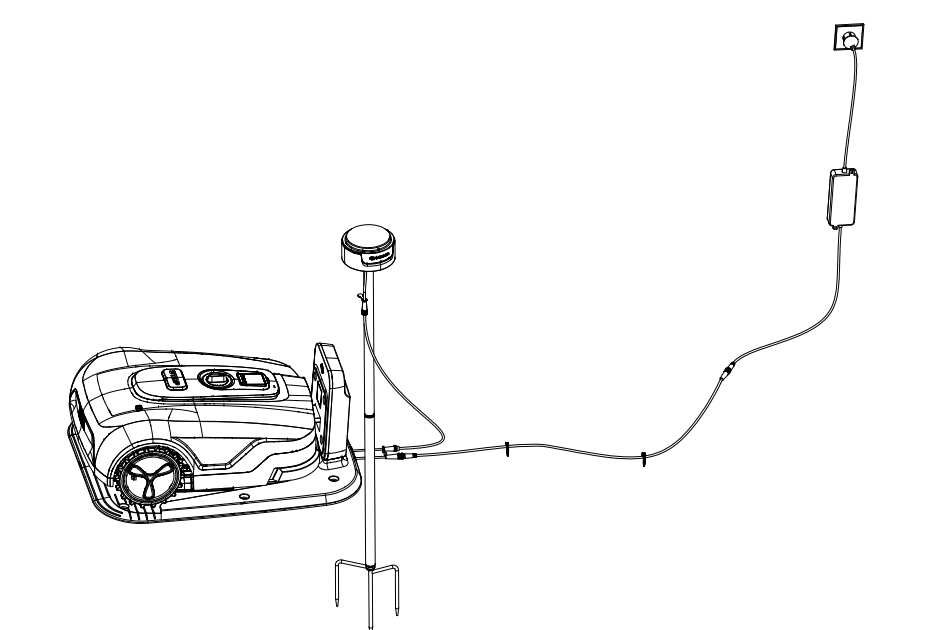
Ensure the charging station is powered off. Connect the RTK reference station power output port on the charging station to the power input port on the RTK reference station, and fasten the threaded sleeve.
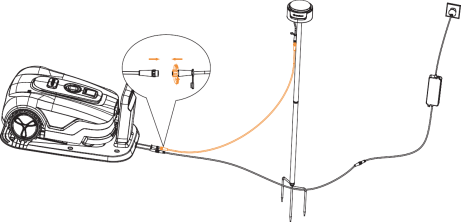
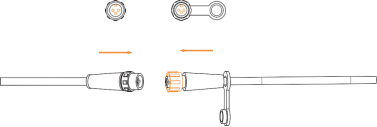
If the RTK reference station is too far from the charging station, add the RTK reference station extension cable.
Insert the tripod into the ground and secure it. Ensure the antenna top surface is facing vertically upward and prevent any wobbling.
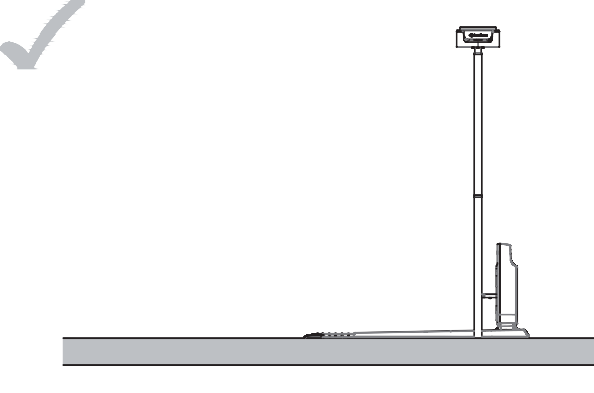
2.4.3 Verify the Installation
Use the installation guidance in the app to complete installation verification.
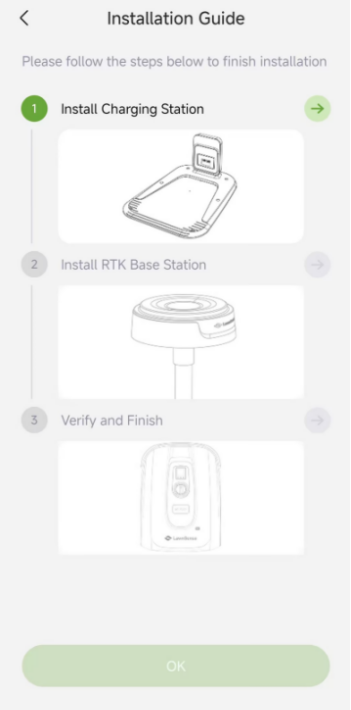
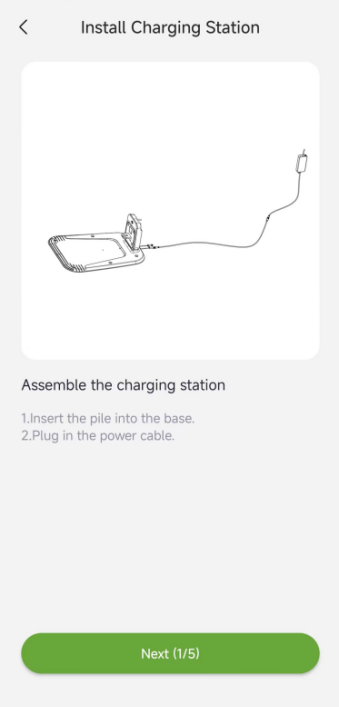
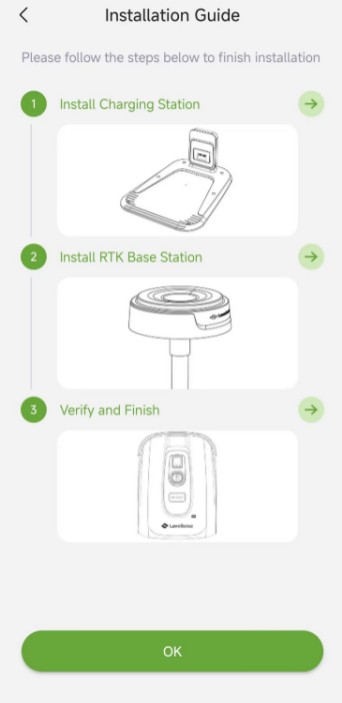
If verification fails, follow the instructions on the app to move the charging station or RTK reference station, and repeat the verification process.
Use the ground pegs to secure the charging station in its current position.
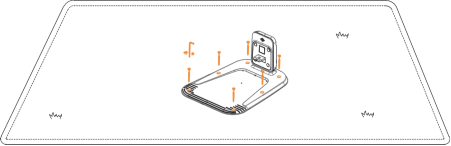
Organize and secure the cables
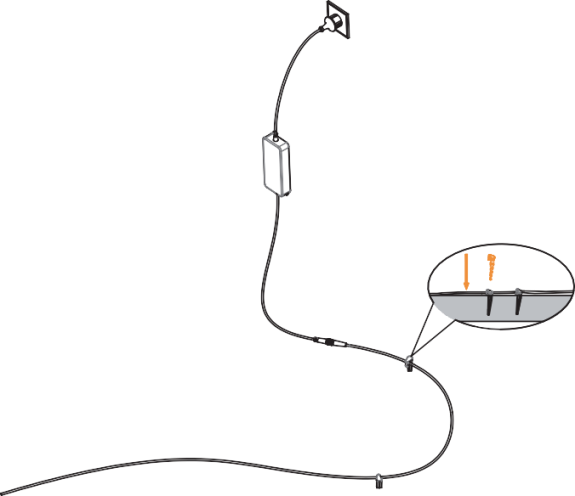
Prevent cables from lying within the mowing area or where the mower might travel, otherwise they may be damaged.
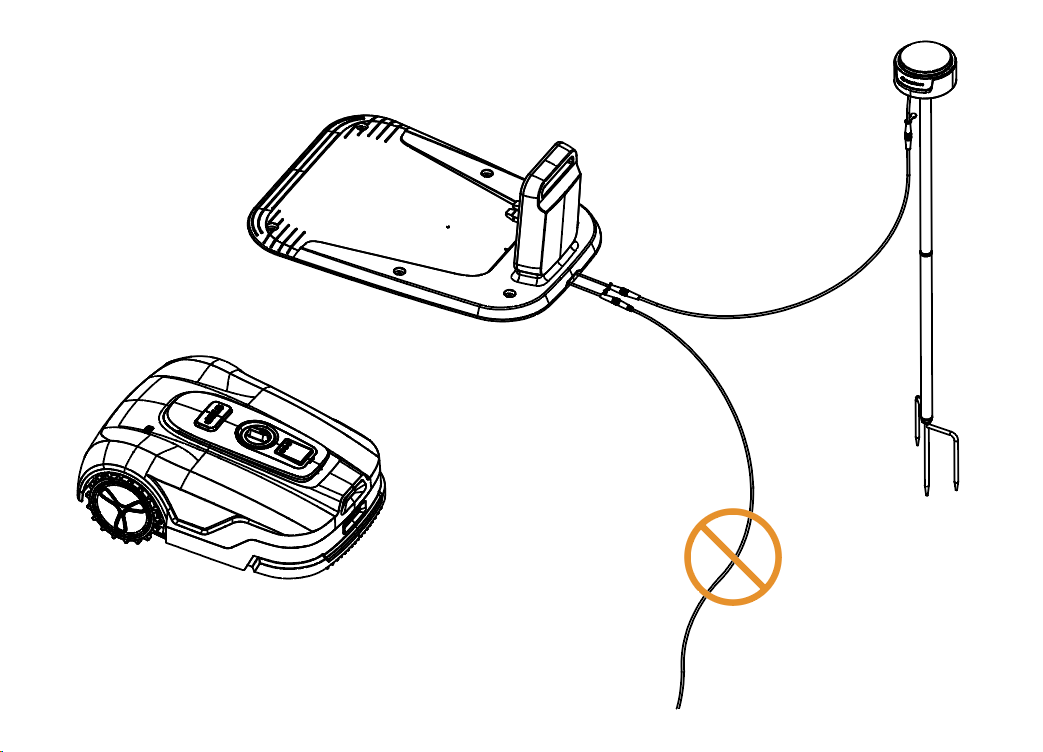
Never allow cables to enter the cutting area or the mower’s path.
Do not move the reference station or the charging station arbitrarily after a map is created, otherwise map coordinates may become invalid and remapping will be required.
2.5 UPGRADE TO THE LATEST FIRMWARE
For an optimal experience, upgrade to the latest firmware version before use. When a new firmware version is available, opening the LawnSense App will automatically trigger an upgrade pop-up. Follow the instructions in the pop-up, or go to “Settings” > “MOWER” > “Upgrade” > “Update” to perform the upgrade.
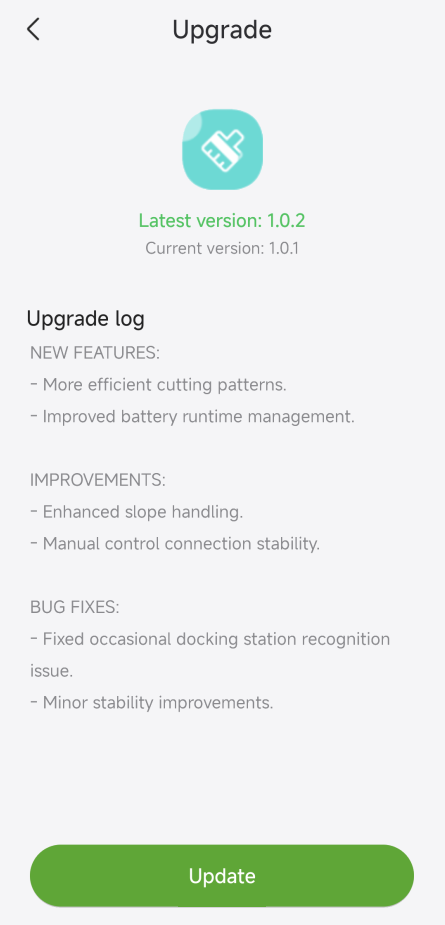
After starting the mower, keep it connected to the network. Follow the instructions in the pop-up window and wait 10-30 minutes (depending on network conditions) for the firmware upgrade to complete automatically. Do not power off or perform other operations during this process. Once the app prompts that the upgrade is successful, you can begin use.
2.6 CREATE MAP
2.6.1 Creating the Boundary
Ensure the mower is powered on and on docking, and your phone is connected to the mower via Bluetooth.
If the mower is locked, you must enter the PIN code before operating it. The default password is 0000 and can be reset via the LawnSense App.
Tap “Create a map” to begin mapping.
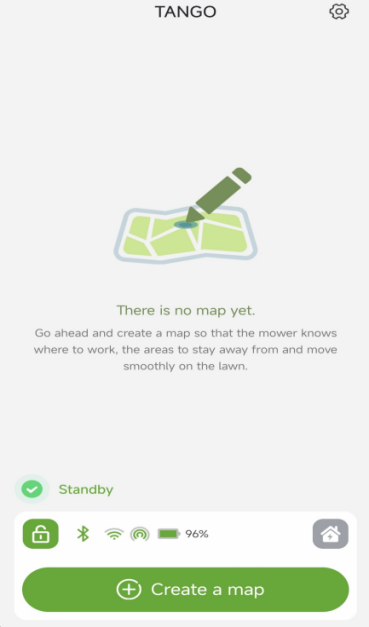
The mower will exit the charging station while completing positioning and heading calibration.
During the calibration, the mower will back out of the charging station. Do not stand directly in front of its backward path.
Use the app to control the mower to a suitable starting point at the edge of the lawn. Tap “Reached Start Point” to begin recording the boundary path. During mapping, maintain a distance within 10 meters (32.8 feet) of the mower.
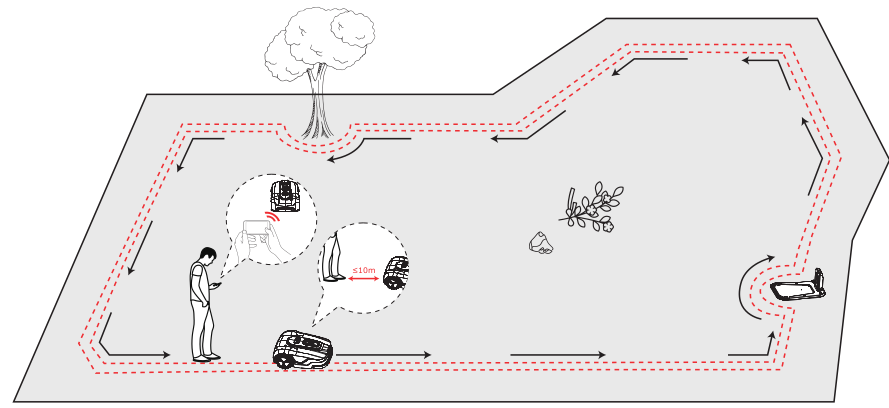
If the area to be mapped does not surround the charging station, try to orient the charging station towards the first area to be created; otherwise, the map may not save.
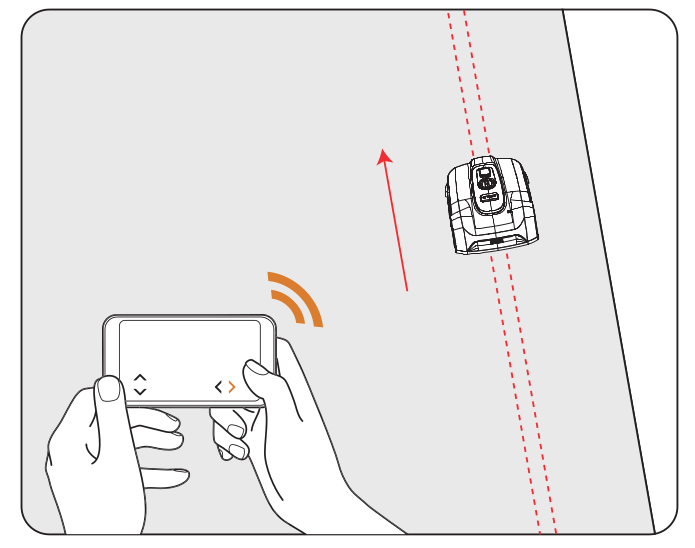
Control the mower to move along the edge via the app.
Return near the starting point to complete the boundary mapping。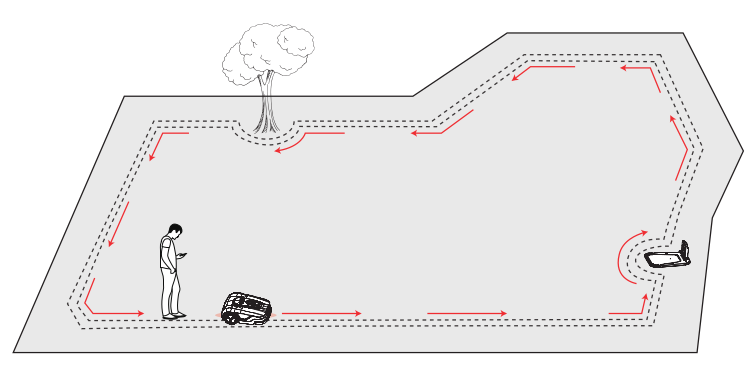
2.6.2 Create an Off-limit Island
If you do not want the mower to enter certain areas, such as around flower pots, BBQ grills, tents, water pipes, ponds, fountains, benches, large trees, or where you recently installed a trampoline or furniture, you can set them as off-limit islands for protection.
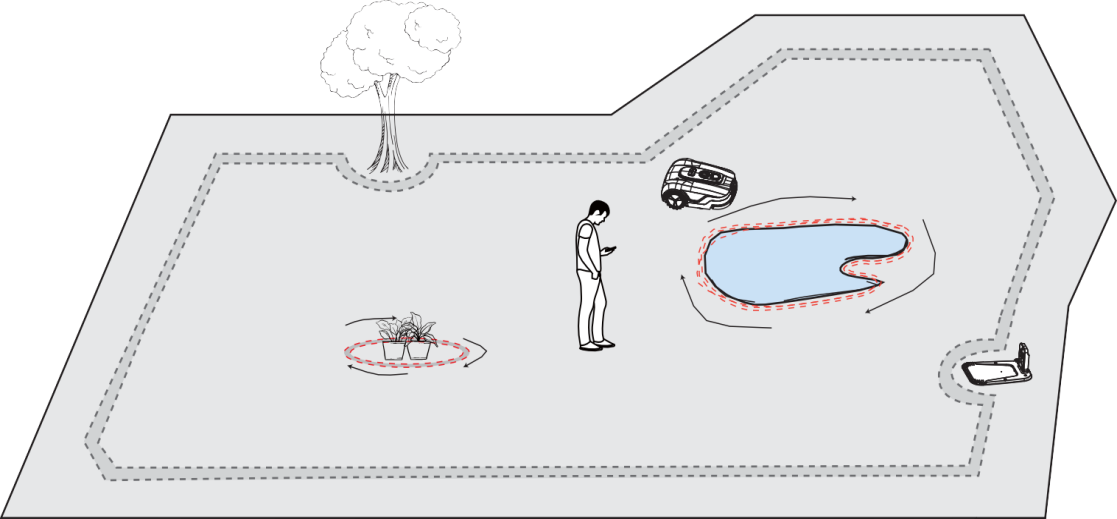
Follow the instructions on the app. When you need to cancel this area (e.g., after removing the trampoline from the lawn), simply delete it via the app.
2.6.3 Create a Channel
If creating multiple zones, the mower may automatically generate a channel based on the trajectory from the current zone to the next. If needed, you can delete this auto-generated channel and create a custom one manually using the app.
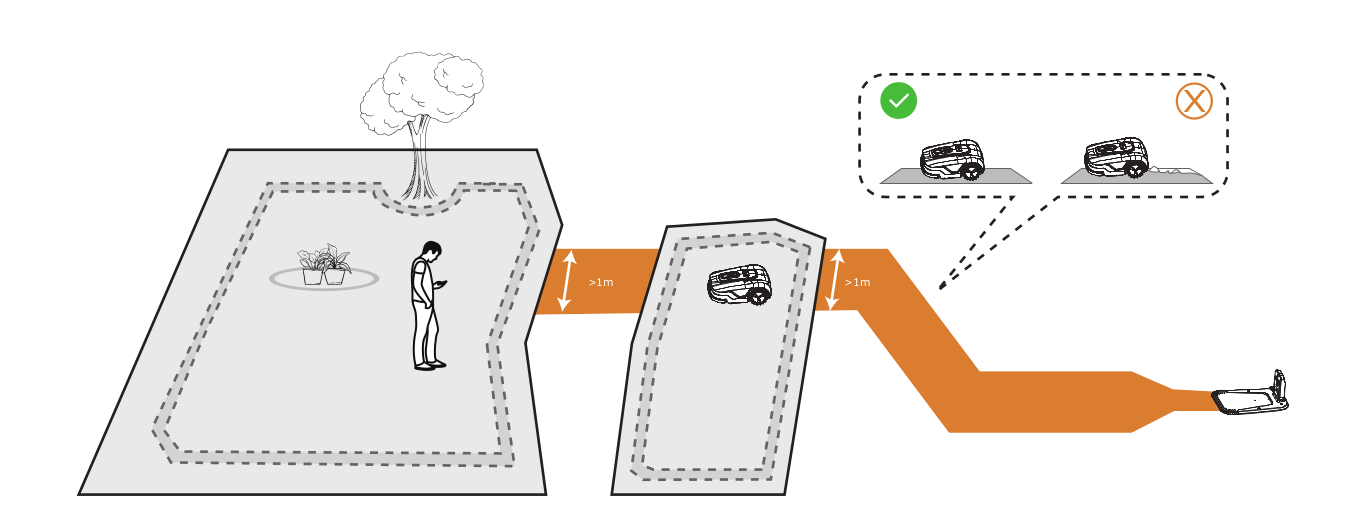
Ensure the channel is clear of obstructions and maintains a minimum width of 1 meter (3.3 feet) along its entire length.
For manual creation, control the mower to the starting point of the channel inside a boundary, then tap “Reached Start Point”. The subsequent trajectory will be recorded as the channel path. After reaching another boundary, tap “Done” to complete channel creation.
2.6.4 Create a VisionOff Area
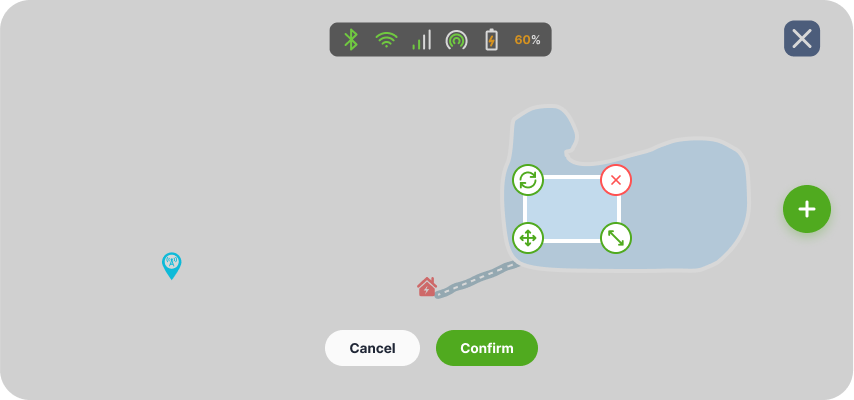
A vision disabled zone is an area where the mower automatically turns off its vision-based obstacle avoidance and passes through directly instead of detouring. This is useful for flat, non-grass surfaces such as stone paths or utility covers, where visual detection may otherwise cause the mower to avoid unnecessarily. Tap “Create VisionOff Area” and a rectangular box will appear on the screen. You can drag, scale, and rotate the box to adjust the area as needed.
3 DAILY USE
3.1 LAWNSENSE APP
3.1.1 About the App
LawnSense App provides the following functions:
- Create and manage your account.
- Bind and activate your mower.
- Update firmware and configure network settings.
- Create and manage the mowing map with multiple zones.
- Monitor mower status and work progress, and remotely start, stop, or return the mower to the charging station.
- Manage mowing settings, including schedules and map-related configurations.
- Configure safety and security settings, including PIN code reset and anti-theft protection.
- Unbind the mower while choosing whether to retain or erase user data.
- Access user guides and online customer support.
3.1.2 Download, Register, and Log in
- Download the LawnSense App from the Apple App Store or Google Play Store.
- Register and log in to your account.
- Turn on Bluetooth on your phone and ensure that your phone has an active network connection.
3.1.3 Update LawnSense App and Firmware
To experience the latest features and updates, always keep your LawnSense App up to date. You will receive a notification when a new version of the app is available.
To manually check for firmware updates, go to “Settings” > “MOWER” > “Upgrade”. The following conditions must be met for a successful firmware upgrade:
- The mower is in the charging station.
- The mower has a stable network connection (via 4G or Wi-Fi).
- The battery level is above 30%.
3.1.4 Home Page
The Home page displays mower status, RTK status, and current mowing task information.
From the Home page, you can:
- View mowing schedules for all zones or selected zones
- Adjust mowing settings
- Start or pause mowing tasks
- Send the mower back to the charging station
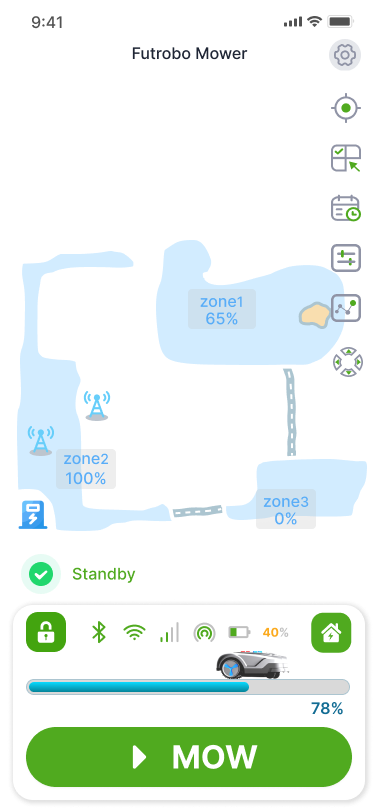
| No. | Component | Icon | Function |
|---|---|---|---|
| 1 | Child Lock & Safety Lock |  |
Tap to enter the child lock and safety lock settings. A closed lock icon indicates the device is locked. |
| 2 | Battery Display |   |
Displays battery level and charging status. A lightning bolt icon indicates charging. |
| 3 | RTK Status |  |
Displays RTK signal quality and the number of satellites for both the reference station and the mower. |
| 4 | Bluetooth |  |
Shows Bluetooth connection status. Tap to reconnect if disconnected. |
| 5 | Wi-Fi |  |
Shows Wi-Fi connection status and signal strength. Tap to view and connect to available networks. |
| 6 | Return |  |
Tap to send the mower back to the charging station. |
| 7 | Mower Status |          |
Indicates the current mower status: Standby, Mowing, Returning, Charging, Mapping, Fault, Upgrading, Locked, or Offline. |
| 8 | Rain Delay |  |
Indicates that the mower is in a rain delay countdown. |
| 9 | Settings and Info |  |
Tap to access mower and app settings. |
| 10 | Center Map |  |
Tap to center the map and reset zoom to default level. |
| 11 | Zone Selection |  |
Tap to select zones for mowing. |
| 12 | Mowing Schedule |  |
Tap to configure mowing schedules. |
| 13 | Mowing Settings |  |
Tap to configure mowing direction, cutting width, pattern, speed, and obstacle avoidance level. |
| 14 | Mowing Statistics |  |
Tap to view mowing history and statistics. |
| 15 | Manual Operation |  |
Tap to enter manual control mode. |
3.2 BASIC USE
3.2.1 How LawnSense Mows
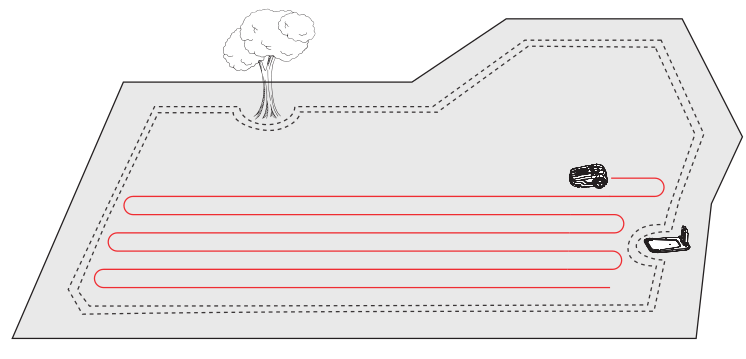
When a mowing task starts, the mower first performs a perimeter cut along the boundary of the work area. It then continues mowing in a back-and-forth pattern.
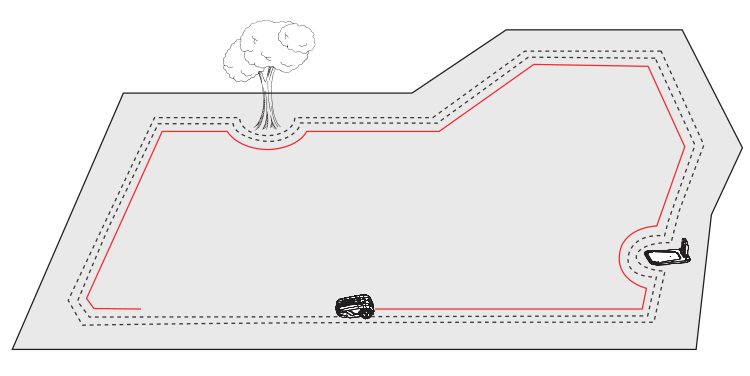
Within the work area, the mower follows optimized paths generated by its navigation algorithm. The mowing direction and pattern may be adjusted based on user settings to ensure efficient coverage and minimize overlap.
3.2.2 Manage Multiple Zones
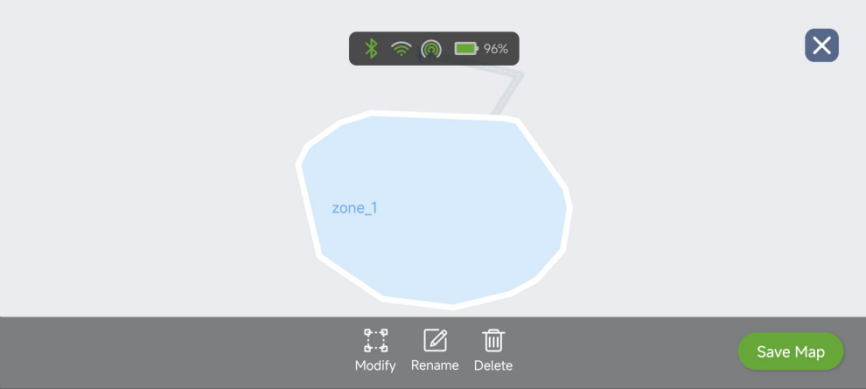
You can create multiple zones on the map. Each zone can have a unique name, mowing direction, and mowing pattern. Once a zone boundary is completed, the zone is created automatically. You can continue creating additional zones and connect them with channels.
Renaming a Zone
- Go to “Map Management” from the Settings page.
- Tap “Edit” to enter the map editing page.
- Select the zone you want to rename.
- Tap the “Rename” and enter a new name for the zone.
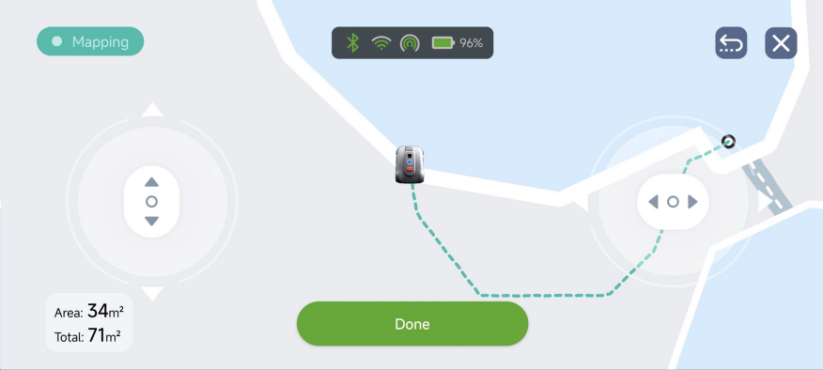
Modifying Zone or Island Edges
- Go to “Map Management” from the Settings page.
- Tap “Edit” to enter the map editing page.
- Select the zone or island you want to modify.
- Tap the “Modify” to edit the edge of the selected area.
- Manually control the mower to a point on the edge you wish to start modifying, then tap “Reached Start Point”. The subsequent trajectory will be recorded as the new edge line.
- After the mower’s trajectory intersects again with the original edge line, tap “Done” to complete the modification.
3.2.3 Start Mowing
One-time Mowing
You can start a one-time mowing task in either of the following ways:
- Press “MOW” in the app.
- Press the “START + OK” keys on the control panel.
Scheduled Mowing
To set up a scheduled mowing task:
- Go to “Settings” > “MOWER” > “Mowing schedule”.
- Select a day for the schedule.
- Select the start time and end time.
- Select the zones to which this schedule applies.
- Tap “Confirm” to save the settings.
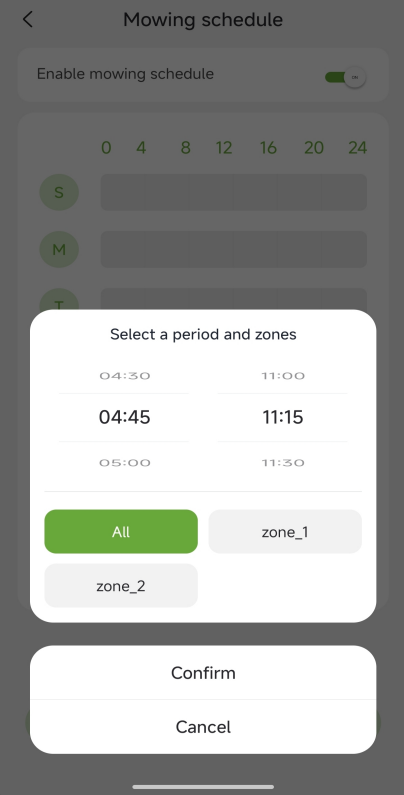
If the task completes earlier (i.e., progress reaches 100% before the scheduled end time), the mower will return to the charging station and will not start a new cycle within the same time slot.
If the task is not completed by the scheduled end time, the mower will return to the charging station at that time regardless of the progress percentage, and the task will be terminated.
Enabling or Disabling the Mowing Schedule
You can turn the mowing schedule on or off by toggling the “Enable mowing schedule” switch. When switched off, all mowing schedules are disabled.
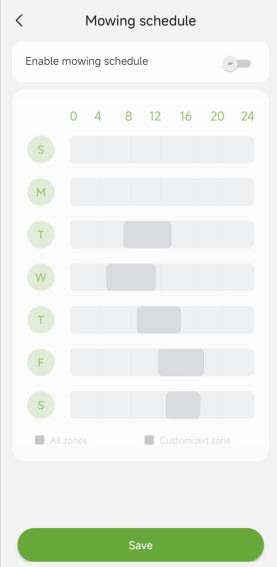
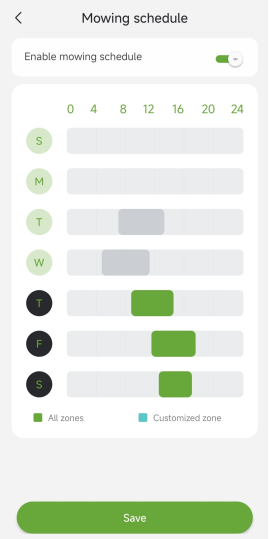
You can also tap the weekday icon to disable the scheduled tasks for that specific day. The mower will not perform any scheduled mowing tasks on that weekday.
3.2.4 Mowing Settings
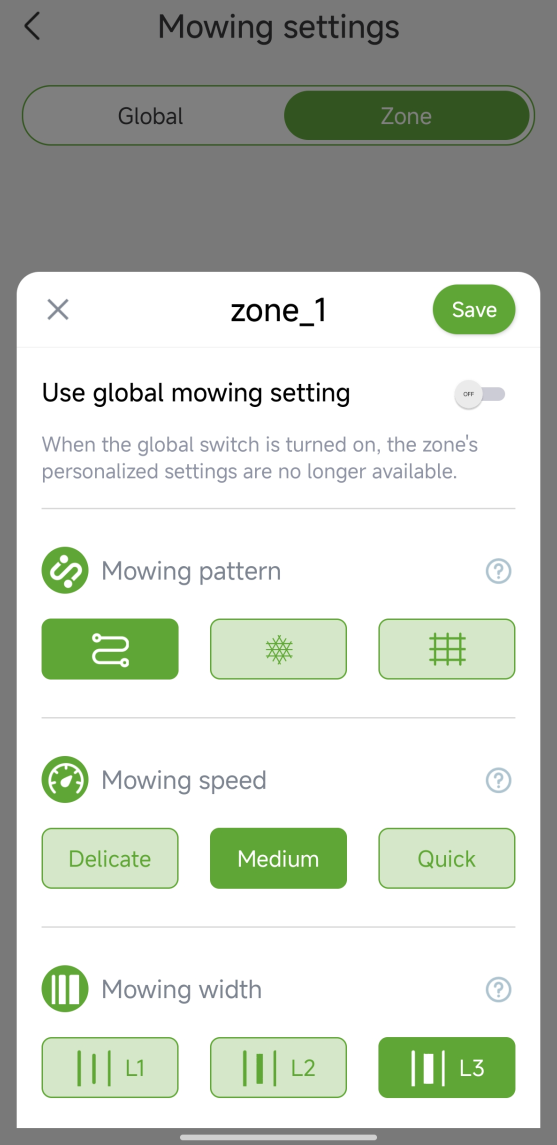
You can go to “Settings” > “MOWER” > “Mowing settings” to customize various mowing parameters based on your lawn conditions and personal preferences. These settings include mowing direction, mowing pattern, mowing speed, blade speed, mowing width, obstacle avoidance level, etc. Adjusting these options allows you to achieve the best cutting performance and efficiency for your specific lawn.
Mowing parameters are divided into global settings and zone settings, allowing you to set different parameters for each zone. Tap the Zone tab at the top of the settings page and select the zone you want to configure. You can also toggle Use global mowing settings to switch between using the global configuration or custom settings for the selected zone.
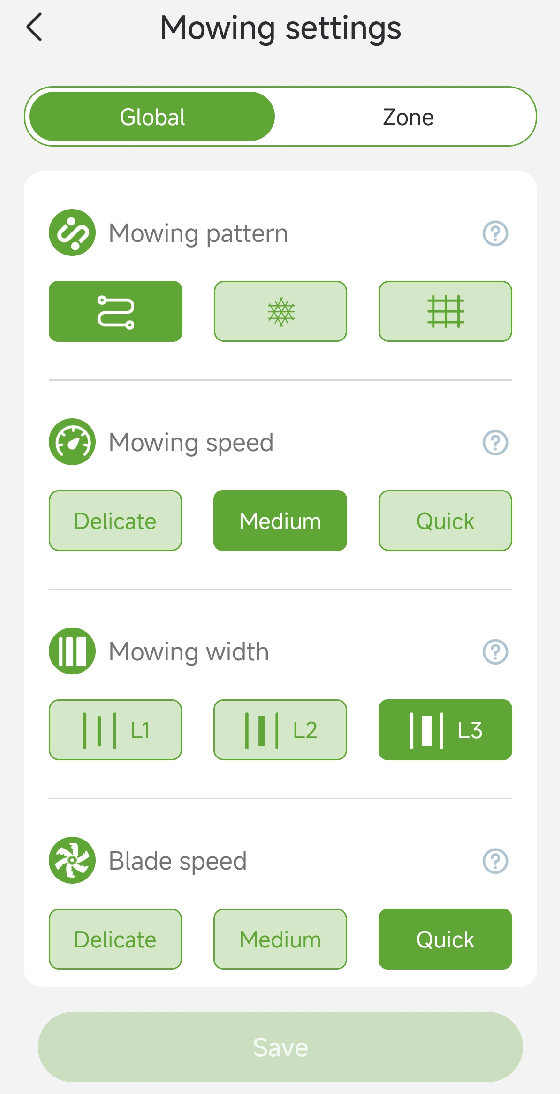
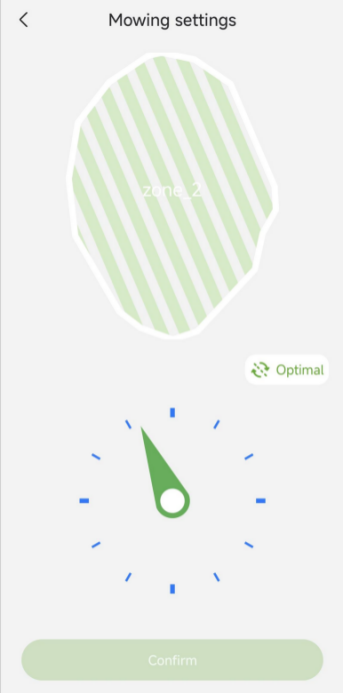
Mowing Direction
This setting determines the angle at which the mower cuts the lawn. Adjusting the direction helps reduce repeated wheel tracks and promotes healthier grass growth by varying the cutting pattern.
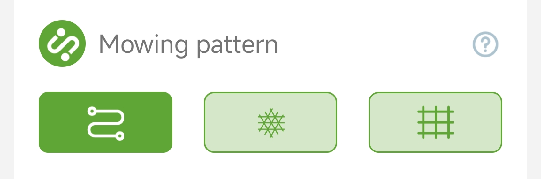
Mowing Pattern
The mower offers multiple mowing patterns to suit different lawn types and aesthetic preferences:
- Zigzag: Uses an efficient back-and-forth path for quick coverage of open areas.
- Grid: Creates a neat, professional-looking finish with perpendicular crossing lines.
- Diamond: Generates a multi-directional geometric pattern for enhanced lawn texture and reduced wheel tracks.
During a single mowing session, only one mowing direction is used to complete each zone. After a zone is fully mowed once, the mowing direction will change during the next mowing cycle.
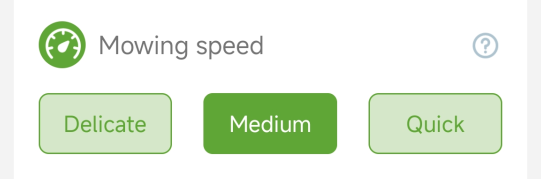
Mowing Speed
This setting controls how fast the mower moves while cutting. A lower speed helps reduce missed grass and is suitable for dense turf. A higher speed can be used on flat terrain with short grass.
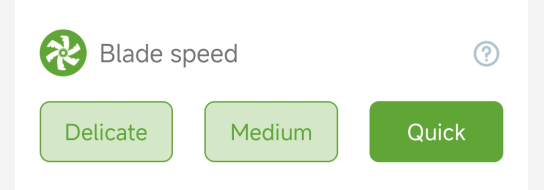
Blade Speed
This setting adjusts the rotation speed of the cutting blades. A higher blade speed provides a cleaner cut for dense grass but consumes more battery power. A lower blade speed helps save power during lighter mowing tasks.
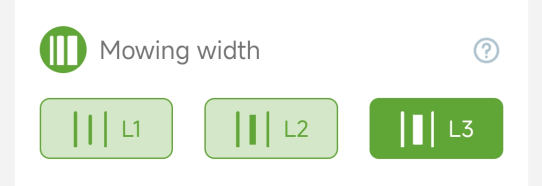
Mowing Width
This setting determines the mowing coverage width for each pass. A smaller width increases path overlap, helping reduce missed strips and ensure even coverage. A larger width allows faster mowing when high precision is not required.
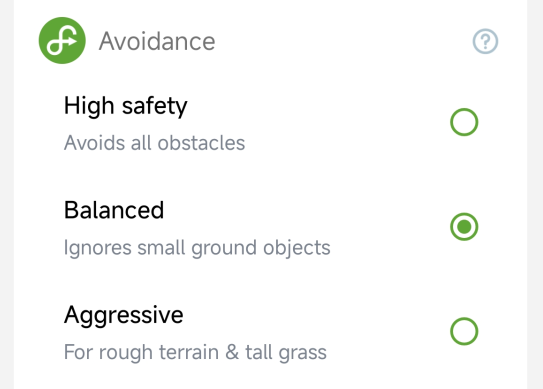
Obstacle Avoidance
This setting determines how the mower responds to obstacles in its path:
- High safety: Avoids obstacles with the highest sensitivity, providing maximum protection.
- Balanced: Ignores small objects while maintaining a balance between mowing efficiency and safety.
- Aggressive: Uses lower obstacle avoidance sensitivity for rough terrain or taller grass, reducing unnecessary stops.
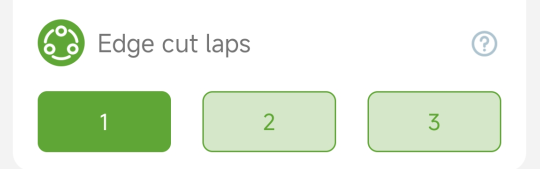
Edge Cut Laps
This setting determines how many times the mower travels along the lawn boundary and around islands before starting the main mowing pattern. More laps can provide a cleaner edge finish.
3.2.5 Adjust the Cutting Height
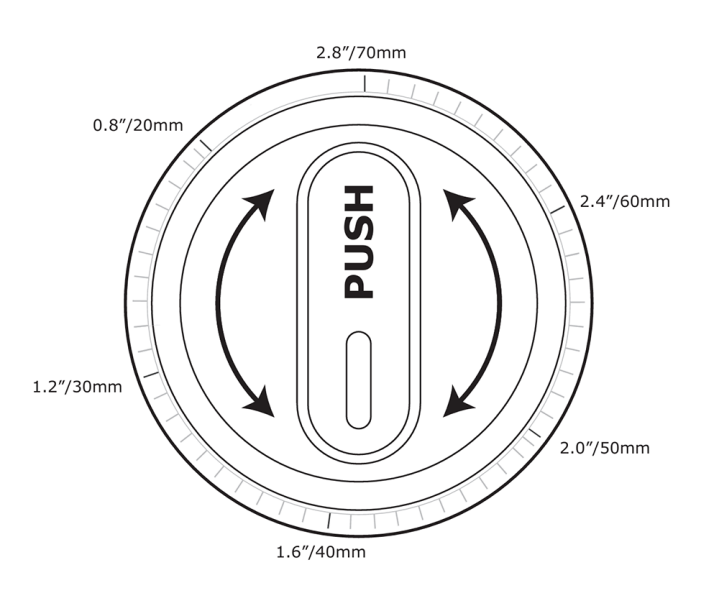
To adjust the cutting height, press down the height adjustment knob and turn it while keeping it pressed. Align the indicator mark on the knob with the desired height level. Release the knob to lock the selected height. The cutting height can be adjusted from 2 cm (0.8 in) to 7 cm (2.8 in).
3.2.6 Rain Sensor
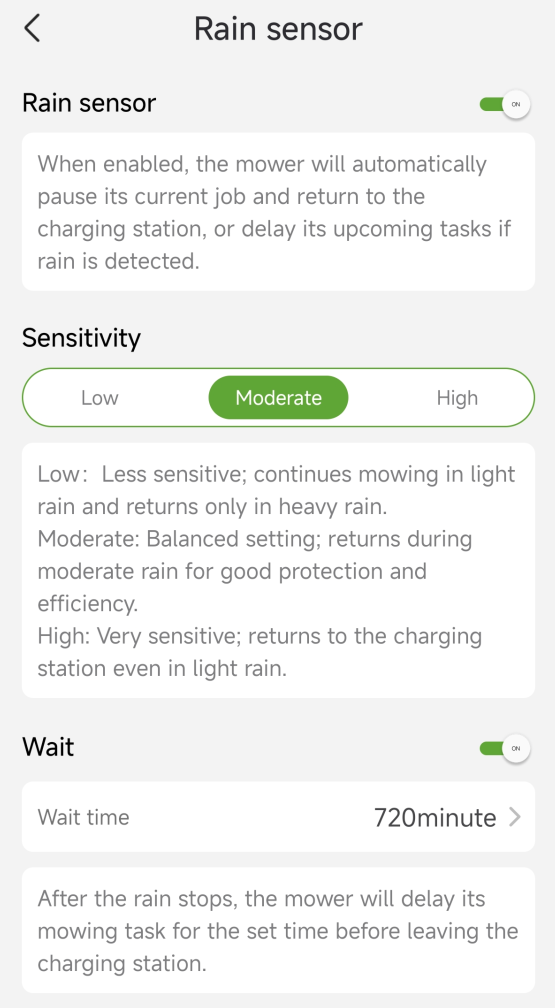
You can go to “Settings” > “MOWER” > “Rain sensor” to configure how the mower responds to rainy conditions. When rain is detected, the mower automatically returns to the charging station. A master switch allows you to enable or disable this feature. You can also adjust the detection sensitivity to suit different weather conditions. Additionally, a “Wait time” setting determines how long the mower waits after the sensor confirms dry conditions before resuming mowing tasks.
3.2.7 AI Obstacle Avoidance
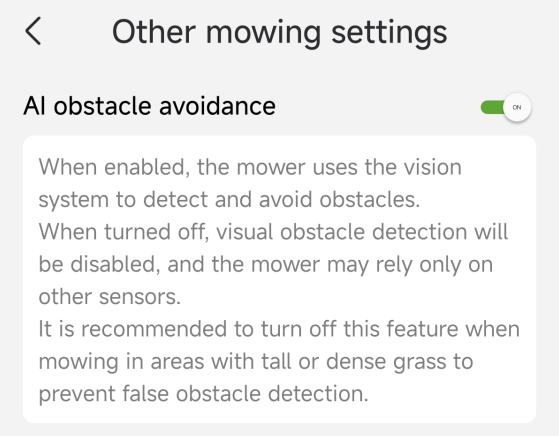
You can turn the AI Obstacle Avoidance on or off in “Settings” > “MOWER” > “Other mowing settings”. When enabled, the mower uses its vision system to detect and avoid obstacles. When turned off, the mower may rely only on other sensors. It is recommended to disable this feature when mowing in tall or dense grass to prevent false obstacle detections.
3.3 DEVICE MANAGEMENT
3.3.1 Device status
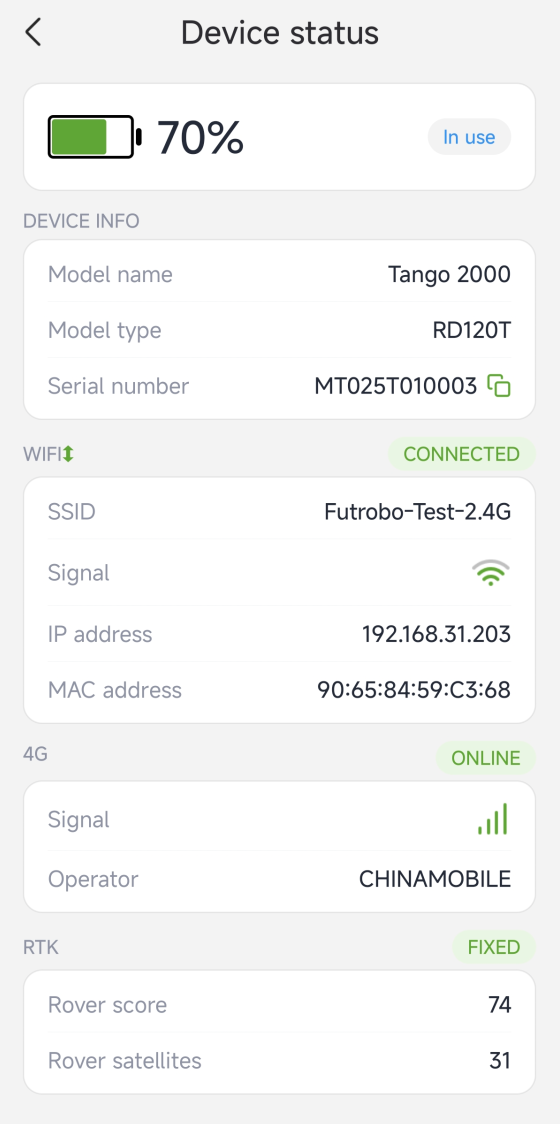
You can go to “Settings” > “MOWER” > “Device status” to view detailed information about the mower, including the model, serial number (SN), battery level, Wi-Fi and 4G connection status, and RTK signal strength.
3.3.2 Maintenance
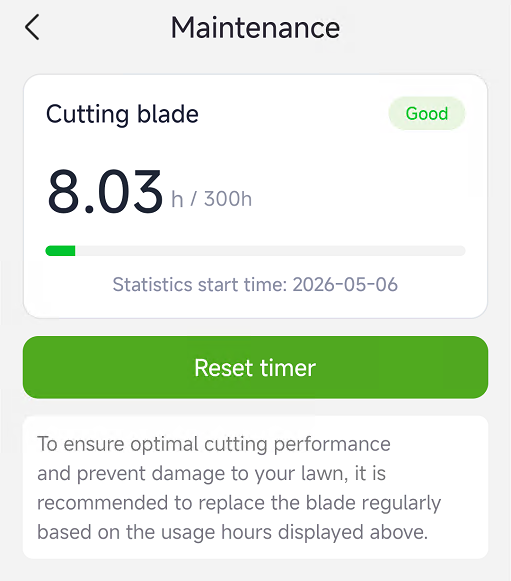
You can go to “Settings” > “MOWER” > “Maintenance” to view the blade usage status. The page shows the accumulated operating time and the date when the timer started. Check this information regularly and replace the blades when the usage time approaches the recommended lifespan to ensure optimal cutting performance. After replacing the blades, tap “Rest Timer” to reset the counter.
3.3.3 Cellular Service
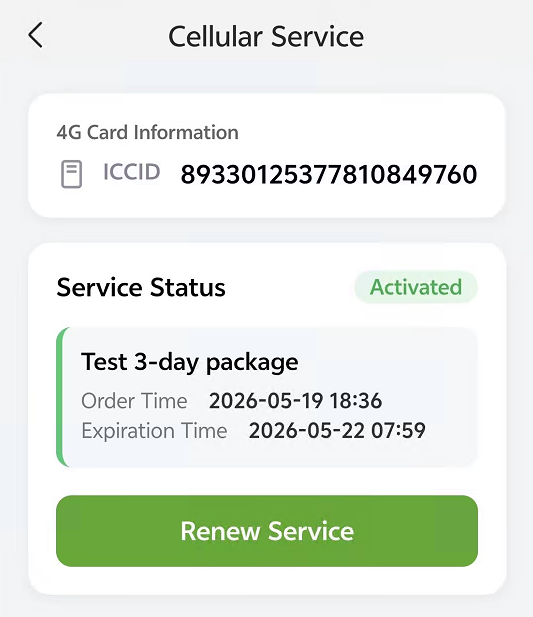
You can go to “Settings” > “MOWER” > “Cellular service” to view information about the built-in 4G SIM card, if equipped, including activation status, subscription details, and expiration date. Tap “Renew Service” to extend the service period.
3.3.4 Sound and Light
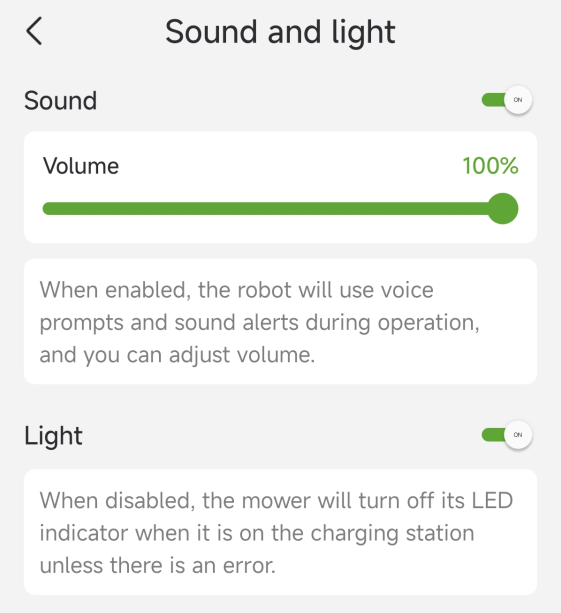
You can adjust sound and light preferences by navigating to “Settings” > “MOWER” > “Sound and Light Settings”.
Sound
Enable or disable voice prompts. When enabled, the mower provides audible guidance and status announcements. You can also adjust the volume level according to your preference.
Light
Turn the LED indicator on or off while the mower is docked at the charging station. When set to off, the LED will remain off during normal charging and standby. Note that the LED may still activate to indicate abnormal conditions or errors, regardless of this setting.
3.3.5 Wi-Fi Management
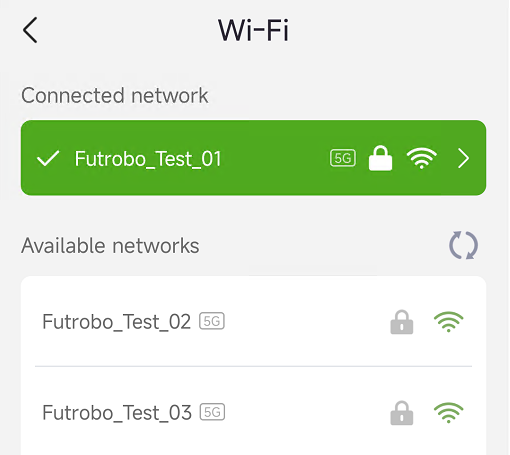
You can manage Wi-Fi settings by navigating to “Settings” > “MOWER” > “Wi-Fi Management”. On this page, you can view the Wi-Fi network the mower is currently connected to and switch to other available Wi-Fi networks.
3.3.6 Unbind Device
You can remove a mower from your account via “Settings” > “MOWER” > “Unbind device”. When unbinding a mower, you will need to verify your identity by entering the verification code sent to your registered email address. You can choose whether to retain or clear your user data during the unbinding process. Once unbound, the mower can be bound to another account.
If you are using an iPhone and registered your account with an Apple ID, you may see a private relay email address on the unbind page. In such case, make sure email forwarding is enabled in your phone settings, and check your actual email inbox for the verification code.
3.3.7 Switch/Add Device
You can add multiple mowers via “Settings” > “MOWER” > “Switch/Add device”. After adding, you can switch between them by selecting a mower from the device list. This allows you to manage multiple mowers under a single account without log in and out repeatedly.
3.4 SAFETY FEATURES
3.4.1 Device Lock
You can go to “Settings” > “MOWER” > “Device lock” to enable Safety Lock or Child Lock. You can also reset the PIN code on this page.
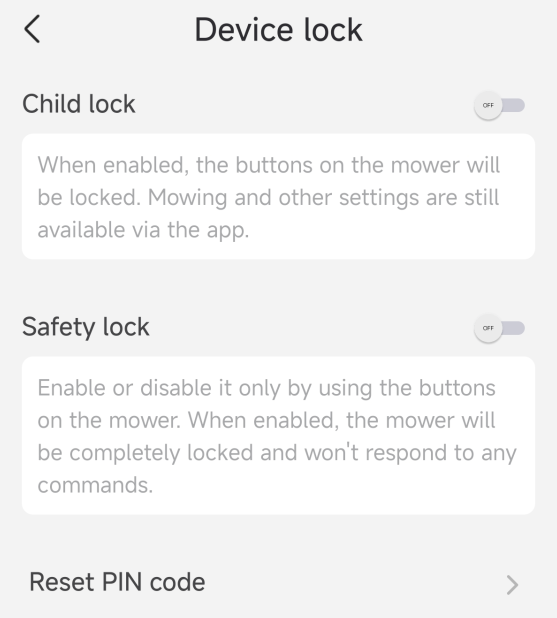
Safety Lock
The Safety Lock helps prevent accidental startup when the mower needs to be moved or cleaned. It also helps prevent unauthorized use. When the Safety Lock switch is turned on, the mower will enter a locked state upon its next startup. Once locked, the correct PIN code must be entered on the mower to unlock it
You can also lock the mower by pressing and holding the “HOME” key. Once locked, the mower cannot be operated until it is unlocked.
The default PIN code is 0000. If you forget a previously set password, you can reset the PIN. Regardless of whether the Safety Lock is enabled in the app, pressing and holding the HOME key can always lock the mower.
Child Lock
The Child Lock helps prevent children or pets from accidentally triggering mower functions.
When Child Lock is enabled, the mowing and return functions cannot be triggered using the buttons on the mower. The lock icon on the mower display will flash. Mowing, return, and mapping functions can still be started from the mobile app.
Reset PIN Code
It is high recommended to reset the PIN code before first use. If you forget your PIN code, you can reset it on this page.
3.4.2 Anti-Theft
You can go to “Settings” > “MOWER” > “Anti-Theft” to enable the anti-theft features to protect your mower against theft. The lift alarm and geo-fence alarm can be enabled separately. When either alarm is enabled, connect your phone to the mower via Bluetooth before transporting the mower to another location to prevent false alarms.
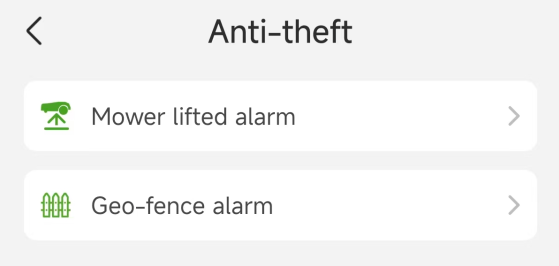
Lift Alarm
When Lift Alarm is enabled, the anti-theft alarm will be triggered if the mower is lifted for approximately 30 seconds. An audible alarm will sound, and you will receive a notification in the app. To stop the alarm, enter the PIN code directly on the mower.
Geo-Fence Alarm
When Geo-Fence Alarm is enabled, the alarm will be triggered if the mower moves beyond the set safe distance outside the mapped boundary. An audible alarm will sound, and you will receive a notification in the app. To stop the alarm, enter the PIN code directly on the mower. When enabling the geo-fence alarm, you can adjust the geo-fence distance.
If the anti-theft function is enabled, you need to enter the PIN code before powering off the mower.
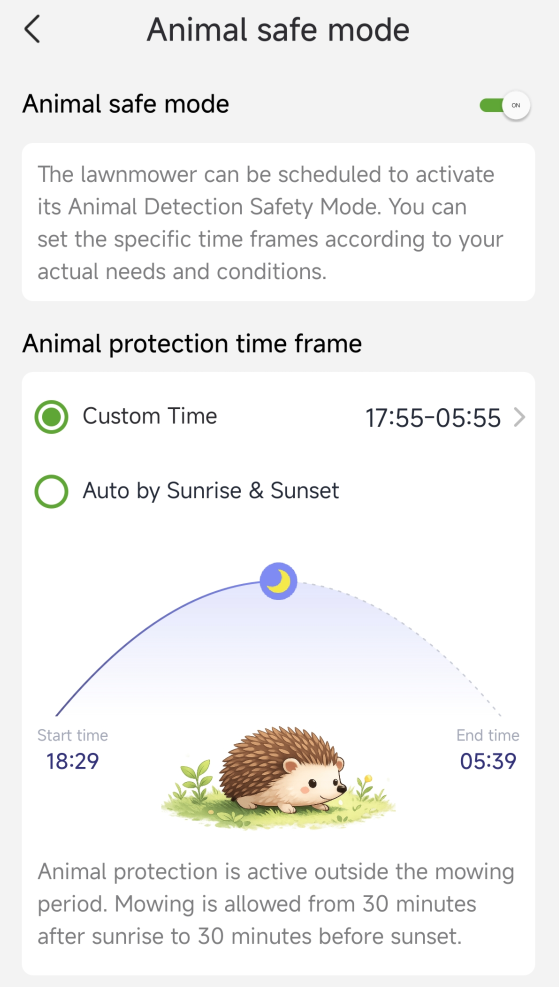
3.4.3 Animal Safe Mode
You can enable Animal Safe Mode to help protect pets and small animals around the work areas by limiting the mower’s operating hours. Go to “Settings” > “MOWER” > “Animal safe mode” to turn this mode on or off. When enabled, you can choose to set a custom protection time period or automatically adjust it based on sunrise and sunset times. During the selected protection period, the mower will not perform any mowing tasks.
3.4.4 Find Device
You can go to “Settings” > “MOWER” > “Find device” to view the mower’s current location on the map. Tap “Navigate” to open navigation and generate a route from your phone’s current location to the mower. Tap “Play Sound” to make the mower emit a sound, helping you locate it nearby.
3.5 APP SETTINGS
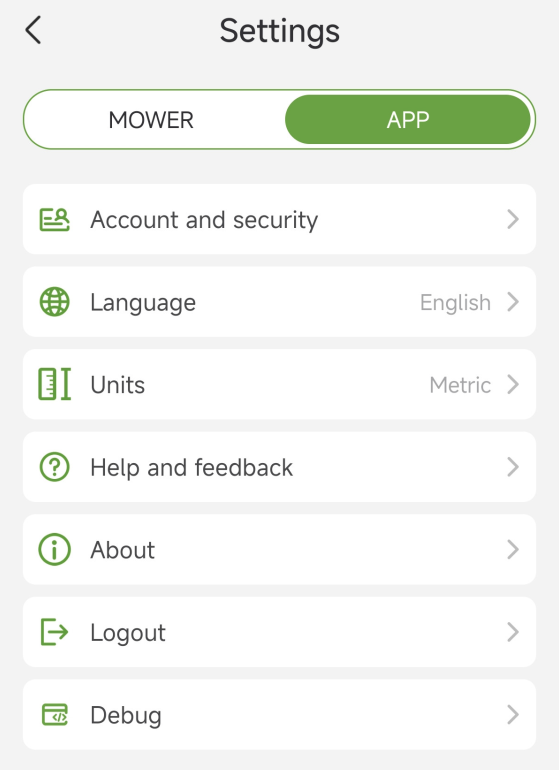
On the “Settings” > “APP” page, you can browse and adjust settings related to the LawnSense application.
3.5.1 Account and security
You can view your bound email address, change your password, download your data, and delete your account.
Language
You can set your preferred language.
Units
You can switch between metric and imperial units.
Help and feedback
You can view the latest user manual, tutorial videos, installation guides, storage guides, and submit feedback.
About
You can view the company’s official website information, the latest user agreement and privacy policy, and the current app version.
Log Out
You can log out of your account. Your data will not be deleted upon logging out.
4 MAINTENANCE AND STORAGE
4.1 Before You Begin
Final charge: Fully charge the mower and switch it off before storage. This helps protect battery health during dormancy.
4.2 Cleaning and Maintenance
Deep clean the mower and charging station: Clean the body, chassis, and blade disc. Remove grass clippings and debris from all moving parts. Inspect the mower for visible damage or excessive wear.
Replace blades and screws: Install new blades and screws. This helps prevent rust and ensures sharp cutting edges for the next season.
Inspection and maintenance check: Perform a general inspection and check parts such as the lower front wheel bearings, blade disc, and body panels for wear. Rotate the wheels and listen for squeaking, grinding, or unusual resistance. Check the charging contacts on both the mower and charging station for corrosion or debris.
4.3 Storage Preparation
Power supply: Disconnect the power supply and store it in a dry, frost-free location.
Storage location requirements: Store the mower indoors only, such as in a garage, shed, or basement. Keep it in a dry environment above freezing temperatures (>0°C/32°F).
Proper positioning: Place the mower on all wheels on a flat surface.
5 FAQ & TROUBLESHOOTING
5.1 Error Codes
If you see an error code on the mower dashboard or in the app, refer to the table below for possible causes and solutions.
| Error Code | Description | Possible Causes | Solution |
|---|---|---|---|
| E100 | MCU internal communication error | 1. Temporary communication failure between internal control modules. 2. Electrical interference or unstable power supply to the main control unit. 3. Loose internal connection (caused by vibration or impact). 4. Firmware or software abnormality. |
1. Restart the mower. 2. If the problem persists, contact customer support. |
| E103 | Camera internal communication error | 1. Temporary communication failure between the camera module and the main control unit. 2. Loose or poor connection of the camera module (caused by vibration or impact). 3. Electrical interference affecting the camera signal. 4. Camera module firmware or hardware abnormality. |
1. Restart the mower. 2. If the problem persists, contact customer support. |
| E104 | Camera lens blocked | 1. The camera lens is stained with dirt, dust, mud, or grass clippings. 2. Foreign objects (such as leaves, twigs, or weeds) are blocking the camera’s view. |
1. Use a soft, dry cloth to gently wipe the camera lens surface and remove any dirt. 2. Check around the lens for any stuck weeds or debris and carefully clean it out. 3. Restart the mower. If the problem persists, contact customer support. |
| E105 | Cutting disc motor error | 1. The cutting disc is tangled with grass, clippings, or debris, causing the motor to stall. 2. The blade is bent, jammed, or damaged due to impact with hard objects such as stones or tree roots. 3. An electrical or mechanical failure of the cutting disc motor itself. 4. The wiring harness connected to the cutting disc motor is loose or has poor contact. |
1. Turn off the mower and wait for the cutting disc to come to a complete stop. 2. Turn the mower over (be careful not to damage the sensors on top of the body) and inspect the cutting disc and blade. 3. Remove any debris tangled around the cutting disc and blade, such as grass, clippings, string, or plastic bags. 4. Check if the blade is deformed, bent, or broken. If damaged, replace it with a new blade. 5. Ensure the cutting disc can rotate freely with no significant resistance. 6. Restart the mower for testing. If the problem persists, contact customer support. |
| E106 | Drive motor error | 1. The wheels are stuck with grass, mud, or debris, causing the drive motor to overload. 2. The working ground is too rough, the slope is too steep, or the grass is too deep, increasing driving resistance. 3. The drive motor has entered an overheat protection state due to prolonged continuous operation. |
1. Turn off the mower. 2. Turn the mower over and inspect both drive wheels. 3. Remove any debris tangled around the wheel axles, such as grass, string, or plastic bags. 4. Move the mower to a flat area with shorter grass and restart it for testing. 5. If the issue is caused by motor overheating, allow the mower to cool down for 15-30 minutes before restarting. 6. If the problem persists, contact customer support. |
| E200 | Mower flipped over | 1. The mower is manually flipped or lifted. 2. The mower encounters a steep slope, ditch, or obstacle during operation, causing it to tip over or roll over. 3. A wheel falls into a hole or groove, causing the mower body to tilt excessively. 4. The ground is too uneven, exceeding the mower’s capability. |
1. Right the mower and place it back on flat ground. 2. Ensure the mower is in safe working conditions and resume operation. 3. If flipping occurs frequently, check the working area for overly steep slopes or dangerous potholes. Adjust the working area by modifying the map as needed. 4. If the problem persists, contact customer support. |
| E201 | Mower lifted | 1. The mower is manually lifted or carried by a person. 2. The mower rides up onto an obstacle such as a thick tree root, rock, or curb, causing the wheels to lose ground contact. 3. The mower becomes stuck on uneven terrain, leaving one or more wheels suspended in the air. |
1. Place the mower back on flat ground. 2. Ensure the mower is in safe working conditions and resume operation. 3. If the problem persists, contact customer support. |
| E202 | Continuous collision | 1. The mower is stuck against an obstacle (e.g., wall, fence, tree root, rock) and unable to move forward. 2. The working area is too narrow or cluttered, causing repeated collisions. 3. The bumper sensor is triggered continuously due to trapped debris or a mechanical issue. 4. The mower is operating on uneven terrain where it constantly hits small obstacles. |
1. Manually move the mower away from the obstacle and place it on flat ground. 2. Check the bumper for any trapped grass, dirt, or debris and clean it thoroughly. 3. Inspect the working area and remove any obstacles that cause frequent collisions. 4. If the area is too narrow or complex, adjust the working area by modifying the map as needed. 5. Ensure the mower is in safe working conditions and resume operation. 6. If the problem persists, contact customer support. |
| E301 | RTK rover error | 1. Poor RTK signal reception on the mower due to environmental blocking (e.g., dense trees, tall buildings). 2. Loose, damaged, or blocked rover antenna on the mower. 3. Connection issue in the mower. |
1. Move the mower to an open area with a clear view of the sky. 2. Wait 1-2 minutes for RTK to reacquire signal. 3. Resume operation after the error clears. 4. If the problem persists, contact customer support. |
| E302 | RTK reference station error | 1. The reference station has no power or is turned off. 2. Poor RTK signal reception at the reference station due to environmental blocking or antenna issues. 3. Loose, damaged, or blocked reference station antenna. 4. Connection issue in the reference station. |
1. Ensure the reference station is powered on by checking the indicator. 2. Ensure the reference station is in an open area and satisfies the location selection requirements. 3. If the problem persists, contact customer support. |
| E400 | Mower out of bounds | 1. The mower has moved outside its defined working area. 2. The boundary environment is complex (e.g., narrow passages, irregular shapes, or obstacles near the boundary), making it easy for the mower to go out of bounds. 3. Inaccurate positioning. |
1. Manually carry the mower back into the defined working area. 2. Ensure the mower is in safe working conditions and resume operation. 3. Check if the out-of-bounds issue occurs near complex boundary areas. Consider simplifying or adjusting the map. 4. If the mower frequently goes out of bounds in certain areas, modify or remap the working area with additional clearance. |
| E401 | Mower trapped | 1. Too many obstacles (e.g., trees, flower pots, furniture, playground equipment) are present in the working area. 2. The working area has narrow passages or dead ends that make escape difficult. 3. The map does not provide enough clearance for the mower to navigate effectively. |
1. Manually move the mower to a more open area. 2. Ensure the mower is in safe working conditions and resume operation. 3. Simplify the working environment by removing unnecessary obstacles. 4. Adjust the map to exclude overly complex or narrow areas. |
| E402 | Mower stuck | 1. The mower is stuck in a small pothole, dip, or depression, causing wheels to slip or lose traction. 2. The wheels are jammed or blocked by obstacles. 3. The drive wheels are spinning (slipping) on wet grass, loose soil, mud, or a steep slope, preventing movement. |
1. Manually move the mower away from the stuck location to flat, open ground. 2. Remove obstacles that block the wheels or the mower. 3. If the mower is stuck in a pothole or uneven terrain, fill the hole or modify the map to exclude that area. 4. If the wheels are slipping on wet grass or loose soil, wait for the ground to dry or adjust the mowing schedule to avoid wet conditions. |
| E403 | Navigation error | 1. The mower is too close to the boundary or obstacles, leaving no viable route. 2. The environment is too complex (e.g., narrow passages, sharp corners, or irregular zones) for the mower to plan a valid path. 3. There are too many obstacles in the working area, preventing the mower from finding a clear route to the target. 4. Inaccurate positioning. |
1. Manually move the mower to a more open area away from boundaries and obstacles, then resume operation. 2. If this continues to occur, try restarting the mower. 3. Simplify the working environment by removing unnecessary obstacles. 4. If this error occurs frequently in certain areas, consider adjusting the map to exclude those areas. |
| E405 | Charging station error (docked but fails to charge) | 1. The charging contacts on the mower or charging station are dirty, corroded, or obstructed. 2. The charging station is not connected to a power source. 3. The power cord or extension cable connections are loose or not properly connected. 4. The power adapter or charging cable is damaged. 5. Internal charging circuit malfunction on the mower. |
1. Check that the charging station is powered on and receiving power. 2. Check that all cables are properly connected, including extension cable joints. 3. Inspect the metal charging contacts on both the mower and the charging station. Clean them with a dry cloth if dirty or corroded. 4. Ensure the mower is properly seated on the charging station with good contact alignment. 5. If the problem persists, contact customer support. |
| E407 | Charging station or reference station position changed | 1. The charging station has been moved to a different location. 2. The RTK reference station has been moved to a different location. 3. The reference station is not properly secured and has tilted. 4. The position change has caused the existing map coordinates to no longer be valid. |
1. If the charging station or reference station was moved intentionally, a new map must be created. 2. If the station was moved accidentally, return it to its original position and ensure it is placed on a level, stable surface and properly secured. The original map may still be usable. 3. Check that the reference station is not tilted. Adjust it to an upright and stable position. 4. If the original position cannot be restored or the map remains invalid, create a new map. |
| E408 | Auto-docking error | 1. The camera lens is dirty, foggy, or obstructed, preventing the mower from recognizing the charging station. 2. The charging station is not placed in a well-lit area, or the lighting conditions are too dark or too bright (e.g., direct sunlight or backlight). 3. The visual markers or features on the charging station are blocked, damaged, or dirty. 4. An obstacle is blocking the path between the mower and the charging station. |
1. Clean the camera lens with a soft, dry cloth to remove dirt, dust, or moisture. 2. Ensure the charging station is placed in a well-lit, stable environment. Avoid direct sunlight shining into the camera or strong backlighting. 3. Check that the front of the charging station (visual markers) is clean, unobstructed, and free from damage. 4. Remove any obstacles between the mower and the charging station. 5. If the problem persists, contact customer support. |
| E900 | Battery overheat | 1. The mower has been operating continuously for an extended period in high-temperature conditions. 2. The ambient temperature is too high (e.g., direct sunlight on a hot day). 3. The battery is old, damaged, or has an internal short circuit. |
1. Turn off the mower and move it to a cool, shaded area. 2. Allow the battery to cool down for at least 30 minutes before resuming operation. 3. Avoid operating the mower during the hottest part of the day. Schedule mowing for cooler hours (e.g., morning or evening). 4. If this error occurs frequently, contact customer support. |
5.2 Other Issues
If you encounter any product or app-related problems, common issues and questions, check out the FAQ articles from ‘Service and Support > Help Center’ on the LawnSense official website (https://www.lawnsenserobot.com ) or from the ‘Help and feedback’ section from the LawnSense App.